Quantcast
Channel: Network and Security Professional
Viewing all 174 articles
Browse latest View live

More than 4 Network Cards in Virtualbox

$
0
0
:::::::To create more then 4 network interfaces on Virtual Box::::: 
C:\Program Files\Oracle\VirtualBox>VBoxManage.exe modifyvm SW1 –nic5 intne
C:\Program Files\Oracle\VirtualBox>VBoxManage.exe modifyvm SW1 –intnet5 N3   (N3 is the name)

Virtualbox supports up to eight network cards. If you look into the *.vbox you will see that there are already preconfigured but disabled. Unfortunately inside the VBox GUI we could only configure up to four. I will show how to get and configure the other.

You have to use VBoxManage to get the other network cards. After the option will always be the NIC Number count one to eight. Here I will use five and the name of the machine that will be configured is “network-test”.

Set Mode and enable NIC

When a Mode is set the NIC will be enabled.

  1. Set NIC five to Host-Only Mode and User vboxnet0 (Initially existing Host-Only Net)
    VBoxManage modifyvm network-test --nic5 hostonly
    VBoxManage modifyvm network-test --hostonlyadapter5 "vboxnet0"
  2. Set NIC five to Bridge eth1
    VBoxManage modifyvm network-test --nic5 bridged
    VBoxManage modifyvm network-test --bridgeadapter5 "eth1'
  3. Set NIC to NAT Mode
    VBoxManage modifyvm network-test --nic5 nat
  4. Use the internal VM net “test01”
    VBoxManage modifyvm network-test --nic5 intnet
    VBoxManage modifyvm network-test --intnet5 "test01"

Configuring NIC

  • To use VLAN and some other things in VMs the Promiscuous mode have to be enabled
    VBoxManage modifyvm network-test --nicpromisc5 allow-all
  • Use other hardware type (Intel Pro/1000 MT Server)
    VBoxManage modifyvm network-test --nictype5 82545EM
  • Dis/connect cable
    VBoxManage modifyvm network-test --cableconnected5 off


Installing common packages on Ubuntu

$
0
0

#sudo apt-get install vim

#sudo apt-get install nano

#sudo apt-get install screen

#sudo apt-get install sysstat

#sudo apt-get install iotop

#sudo apt-get install openssh-server


Connecting GNS3 to Real Networks

$
0
0

One of the interesting things about GNS3 is that you can connect your topology to the real world. For some of your CCNA and CCNP studies you may need to run an actual Web browser or Cisco’s Security Device Manager (SDM) among others. Just connect your topology to your real PC. You could even connect to virtual machines running on your computer inside VMware or Virtual PC. I’ve even set up two copies of Windows XP Professional running inside VMware virtual machines. Then, I ran Cisco soft IP Phones that could talk to each other. You could connect your virtual network to a real network as well. Connecting a virtual topology running within GNS3 to real devices is very exciting, but again, your throughput is going to be limited compared to using real equipment for the entire topology. It only makes sense to use GNS3 in a lab environment and for learning purposes.

Drag a Cloud into your workspace. Right-click the Cloud and chooseConfigure. Click on C1 under Clouds, but choose the NIO Ethernet tab.Administrator rights are required (root account under Linux).

For Windows users, click on the box directly beneath Generic Ethernet NIO, and choose the network adapter you wish to use. For Linux users, click on the drop-down box to choose your network adapter (either your real adapter or a loopback adapter). Click the Add button and OK. You will need to configure the IP settings for your computer’s adapter, and then use theAdd a link toolbar button to create your connection.


You may use your regular network adapter, but I usually create an MS Loopback adapter to connect to. In Windows, use the Add Hardwarewizard in Control Panel. Choose “Yes, I have already connected the hardware.” On the next screen, choose Add a new hardware device at the end of the list and click Next. Choose to “Install the hardware manually…”and click Next. Choose Network Adapters in the list and click Next. ChooseMicrosoft as the manufacturer and then Microsoft Loopback Adapter as the network adapter. Finish the wizard. Then right-click My Network Places and choose Properties. You may wish to rename the new Local Area Connectionas MS Loopback Adapter. Also, assign the proper IP settings to the adapter in order to connect to your topology. Linux has a built-in loopback adapter already installed.

Now start your router and assign an IP address to the interface that is connected to the Cloud. You should be able to ping from the router to your PC (loopback interface) and the other way around. Don’t forget to deactivate any firewall that could block pings on your computer.


Also configure:

Configure DNS:

R1(config)##ip doamin-lookup 

R1(config)##ip name-server 8.8.8.8


Configure NAT:

R1(config)#access-list 1 permit 192.168.138.0 0.0.0.255

R1(config)#ip nat inside source list 1 interface fa0/0 overload

R1(config)#int fa0/0
R1(config-if)#ip nat outside
R1(config-if)#int fa0/1
R1(config-if)#ip nat inside


gns3 to internet steps


Cisco IOS image for GNS3

$
0
0

Download Cisco IOS image for GNS3

Hi dear all, that’s really a great to share my hard work  with you , After a lots of  hit in Google  I finally found trick to search Cisco IOS in free of course. So without talking much here are the link where you can free download Cisco ios image and you can upload or use this ios to the router and as well as in GNS3.
Small Collection of IOS Images.

ftp://ftp.unikon-ua.net/pub/Cisco/IOS/
{Updated}Big Collection of IOS Images (Almost All Cisco IOS Images)
ftp://62.117.115.92/upload/ios/
Another Big Collection

ftp://86.110.172.101/Soft/IOS/


(NEW)Cisco IOS Images Big Collection v3. **Direct HTTP Link**
http://www.jonsfiles.com/IOS%20Images%20for%20GNS3/Cisco_IOS_Collection/IOS/

http://www.intranet.betomt.com.br/repositorio/IOS/CISCO/ASA Binary files for GNS3
http://www.4shared.com/dir/5716575/72cbe353/IOS.html
New Big IOS Collection

ftp://79.120.76.25/torrent/downloaded/ios/


VirtualBox and GNS3

$
0
0

VirtualBox

VitualBox is a cross-platform virtualization application very similar to VMware that runs on Windows, Mac, Linux or Solaris operating systems. VirtualBox provides a generic virtualization environment for x86 systems meaning it may run operating systems of any kind. Also, VirtualBox is usually faster and easier to use than Qemu, especially on Windows and Mac OS X. We recommend to read the manual for a complete understanding of VirtualBox and its features.

Creating Virtual Machines

First, make sure your have installed VirtualBox version >= 4.1, if not you can download it from the official website.

Then you can either create a new Virtual Machine using the Oracle VM VirtualBox Manager or download one of our appliance. The Linux Microcore 4.7.1 appliance has been imported for the following example.

gns3-virtualbox-emulation-02

Now you could create or import other Virtual Machines so you can get more than one VirtualBox guest in GNS3 but here we will create 2 linked clones instead. The concept of linked clone is quite simple, the new cloned VMs will be working with “linked” virtual hard disk and all new changes will be saved in a newly created disk, thus saving your disk space while all changes made in the clone VM will not affect the base VM.

To create a linked clone, right-click on your base VM, here Linux Microcore 4.7.1, and select the “Clone…” entry. Choose a name, reinitialize the MAC address of all network cards and finally the clone type. Repeat the process to create one more clone.

gns3-virtualbox-emulation-03gns3-virtualbox-emulation-04

After completing the last configuration, you should see your 2 clones, named HostA and HostB in this example. You are ready to link your Virtual Machines in GNS3.

gns3-virtualbox-emulation-05

Using VirtualBox VMs in GNS3

Check that VirtualBox is functional in GNS3. Go to Preferences -> VirtualBox, check the path to vboxwrapper and click on the providedTest Settings button. You should see a message if everything goes well. You only need to do this the first time you setup VirtualBox support in GNS3.

gns3-virtualbox-emulation-01

Go to the VirtualBox Guest tab to add the VirtualBox VMs in GNS3. Choose an identifier name, a VM from the VM list (you may have to refresh the list using the provided button) and other options:

  • Number of NICs is the number of network interface cards you will see inside your VM (e.g. ifconfig on Linux).
  • Reserve first NIC for VirtualBox NAT to host OS is to you have your first network interface card (e.g. eth0 on Linux) configured with network address translation (NAT), allowing your VM to access your host network and Internet (if your host can access it of course).
  • Enable console support to activate a serial console access to your VM. Please note that serial console support must also be configured on the operating system running in your VirtualBox guest for this feature to work. Here is a howto for Debian/Ubuntu Linux.
  • Enable console server (for remote access) is to remotely access to your VM serial console. GNS3 creates a mini Telnet server that act as a proxy between the serial console and Telnet clients. This feature requires the Enable console support to be enabled.
  • Start in headless mode (without GUI) will hide the VirtualBox graphical interface when the VM is started. This option is mostly useful if you have configured the previously described console support.

gns3-virtualbox-emulation-06


At this point, you should have added and configured your Virtual Machines in GNS3 Preferences. You can now add your VMs on the workspace, link them, start everything and console to all.

gns3-virtualbox-emulation-07

Once booted, configure valid IP addresses on both guest OS and ping between them. Here are the configuration used in this example:

HostA

tc@Linux:~$ sudo su
tc@Linux:~# ifconfig eth0 10.1.1.1 netmask 255.0.0.0
tc@Linux:~# ping 10.2.2.2

HostB

tc@Linux:~$ sudo su
tc@Linux:~# ifconfig eth0 10.2.2.2 netmask 255.0.0.0
tc@Linux:~# ping 10.1.1.1

gns3-virtualbox-emulation-09gns3-virtualbox-emulation-10

Congratulations, you made your fist VirtualBox lab using GNS3!

Remote VirtualBox server

This is a more advanced topic that shows you how you can use a remote VirtualBox server. To do so, you first have to start vboxwrapper.exe or vboxwrapper.py (requires Python) on your server (VirtualBox must be installed too). By default vboxwrapper will listen for connections on port 11525, this can be changed using command line options (use vboxwrapper –help to display them all).

$ python vboxwrapper.py
VirtualBox Wrapper (version 0.8.4-RC4)
Copyright (c) 2007-2012
Jeremy Grossmann and Alexey Eromenko "Technologov"

Using VirtualBox 4.2.14 r86644
VBoxWrapper TCP control server started (port 11525).
Listening on all network interfaces

On your client, go to GNS3 Preferences, select Show VBoxWrapper Advanced Options, then disable the Enable VBox Manager one. Add an external VBoxwrapper which is the server IP address and port, 192.168.1.69:11525 in this example. Finally, hit the Test Settings button.

gns3-virtualbox-emulation-11

You should then see a similar message in vboxwrapper on your server if the connection has been successful.

Connection from ('192.168.1.69', 54906)
[Errno 54] Connection reset by peer

Finally, as showed earlier in this tutorial, add your VirtualBox guests and start using them as you would normally do. Remember that your VMs will run on a remote server and there will be no VirtualBox GUI on your client. This means you should have a way to access them and the easiest is either to configure console support or have a remote desktop (RDP) connection to your server.


Switches in GNS3

$
0
0

Ethernet Switch devices

GNS3 with Dynamips help integrates an Ethernet switch that supports VLANs with 802.1q trunking. Trunk ports trunk all VLANs known to the switch – no VLAN pruning here. It is just a basic virtual switch with limited functionality that provides the very basics you’d want in a switch. If you drag an Ethernet switch onto the workspace, right-click it and choose Configure, you’ll see the options you may set.

By default, there are 8 ports in VLAN 1 configured as access ports. However, you may in theory have up to 10,000 ports and up to 10,000 VLANs. You are limited to either access ports or dot1q trunking ports.

You may connect the switch to the real world through a cloud device. The Console window in GNS3 may be used to show and clear the MAC address tables using the following commands:

show mac switch_name
clear mac switch_name

You can also see the MAC address table by right-cliking on your Ethernet switch and then choosing MAC Address Table.

If want greater functionality that the virtual Ethernet switch provides that is integrated into GNS3, then you’ll need to add a router with an EtherSwitch card.


EtherSwitch Cards

You can buy an EtherSwitch card that may be inserted into a router. The card will function similar to a switch. In GNS3 you may also insert an EtherSwitch card into a router slot. The 7200 series routers do not support this adapter but many of the router platforms available in GNS3 do. The EtherSwitch card that is supported is the NM-16ESW. Here is a list of some of the features supported by the NM-16ESW card.

  • Layer 2 Ethernet interfaces
  • Switch Virtual Interfaces (SVI)
  • VLAN Trunk Protocol (VTP): domains, all modes (server, client and transparent), pruning and passwords.
  • Trunking: 802.1Q only, no ISL, no dynamic auto or dynamic desirable mode.
  • EtherChannel: no LACP and Pagp support. Manual configuration supported.
  • Spanning Tree Protocol: simple STP supported but no MSTP, RSTP or other advanced stuff.
  • Cisco Discovery Protocol
  • Switched Port Analyzer (SPAN)
  • Quality of Service: mls qos commands and mls qos maps are supported.
  • IP Multicast Support
  • Storm Control
  • Flow Control

However keep in mind that this module works differently than a real Cisco switch and doesn’t support all the features of a Cisco Catalyst Switch. At this moment, it is not possible to emulate Catalyst switches with Dynamips/GNS3. This is due to the impossibility to emulate ASIC processors used in those type of devices. Please see the hardware emulated page for a complete list of missing features for EtherSwtich module.

Not all commands that exist on an actual switch are supported by the NM-16ESW card, but as you can see, using an EtherSwitch card gives you a lot more features than the integrated virtual switch. If you wish to use this card, I recommend that you download the documentation from Cisco’s official EtherSwitch module page. Only vlan database mode is possible (not the newer global configuration mode) and the show vlan command is show vlan-switch, for example.

To use the card, just add a router and include the NM-16ESW adapter or the EtherSwitch router device if you have configured a c3700 IOS image in GNS3.


How to add ASA Firewall to GNS3

$
0
0

1. Download GNS3, I accept all the defaults (I actually tick to install SuperPuTTy, as tabbed console windows can be handy when using GNS3). Launch the program, you will be greeted with the following setup wizard. Select Option 1.

Note: You can do the same in future, by going to Edit > Preferences

Setup GNS3

2. Check that the path to the ‘projects’ and your ‘images’ folder are where you want them to be. The defaults are fine but if you run GNS3 on several machines you might want to choose something like Dropbox > Apply > OK.

GNS3 Images

3. Option 2.

Setup GNS3 Step By Step

4. Click Test Settings > Have patience, it can take a couple of minutes > Apply > OK.

Test GNS3 Settings

Adding Router Images to GNS 3

5. Option 3

Note: You can visit the same section in future by clicking Edit > IOS Images and Hypervisors.

GNS3 Idle PC

6. Image file > Browse to the image you want to import. Here on GNS3 8.6 you can select the filename.bin file, with older versions you need to extract that file to a filename.image file.

Note: You need to legally download these images from Cisco. This means you need a CiscoCCO account, and a valid support agreement. DO NOT email me and ask for Cisco IOSimages, (I will just ignore you!).

GNS3 Router Images

7. As mentioned above, it will convert my filename.bin image to an extracted filename.image file > Yes.

IOS Images for GNS3

8. Set the Router platform and model > In the IDLE PC section click Auto calculation > This can take a while.

Note: You can do this later from the main workspace, and test a range of settings. I you don’t do this your virtual network devices will eat all your CPU power!

GNS3 IDLE PC calculation

9. When complete click Close > Save > Close.

IDLE PC

10. You can now start that model router to the workspace and use it. Repeat for each model of router you want to add.

Access Router in GNS3

Adding a Host to GNS3

Having a host machine for you labs is handy, usually you just need to be able to ping, or perform tracerts. So you can download a small Linux image from GNS3. There are a few options but I prefer linux-microcore.

11. Edit > Preferences.

nEdit GNS Properties

12. Quemu > Quemu Guest > Give it an identifier name (can be anything) > Browse to, and select the image you downloaded.

GNS 3 Setup Host

13. Save > OK > Apply.

Linux Microscore Qemu Guest Settings

14. You can now drag a Quemu Guest machine onto the work space, and console into it.

GNS 3 Host Cmd Window

Adding a Cisco ASA to GNS3

Yes you can add Cisco PIX as well, but there’s not many of them left in the wild.

15. Edit > Preferences > Quemu > ASA > Give it an identifier name (can be anything) > Set the RAM to 1024 > Set the Qemu options to;

-vnc none -vga none -m 1024 -icount auto -hdachs 980,16,32

Set the Kernel cmd line option to;

-append ide_generic.probe_mask=0x01 ide_core.chs=0.0:980,16,32 auto nousb console=ttyS0,9600 bigphysarea=65536

GNS 3 Add ASA Firewall

16. You need two files to run the ASA, an initrd file and a kernel file. You need to create these from a legally obtained copy of the asa843-k8.bin file.

Should you wish to locate these files form a less reputable source you are looking for
asa842-initrd.gz and asa842-vmlinuz, again don’t email me for them! If you are too stupid to use a search engine, then technical ninjary is not the correct career choice for you.

Ad Virtual ASA to GNS3

17. Finally select the vmlunuz file > Open.

GNS3 ASA vmlinuz File

18. Save > OK > Apply.

ASA 8.4 Add to GNS3

19. You can now drag an ASA onto the workspace and console into it (it takes a while, be patient). When the ASA starts it has all the licenses disabled, to add them you need to change the ASA’s activation key. An ASA Activation key is usually linked to the serial number of the ASA, in this case we don’t have a serial number, (that’s not strictly true, if you check, it’s something like 12345678). So I will publish a working activation key*

*Disclaimer, this will only work on this virtual ASA, and it’s published elsewhere on the Internet, if I receive a request to remove it I will do so.

Another ‘quirk’ is every time you add a new ASA to the workspace, you need to go through this process, if you enter the commands below you can issue a reload and also save the ASA, without the need to re-enter the activation key.

activation-key 0xb23bcf4a 0x1c713b4f 0x7d53bcbc 0xc4f8d09c 0x0e24c6b6
{This can take 5-10 minutes}
copy running-config startup-config
{Enter}
copy startup-config disk0
{Enter}

ASA Activation Key

20. When it comes back up, (again it will take a few minutes). Your can check your ASA’s licensed features.

ASA Licences Features in GNS

gns3 to asa internet steps

To Allow ICMP (Pings) from the inside Workstation as it will be blocked by default: 

ASA(config)# class-map icmp-class

ASA(config-cmap)# match default-inspection-traffic

ASA(config-cmap)# exit

ASA(config)# policy-map icmp_policy

ASA(config-pmap)# class icmp-class

ASA(config-pmap-c)# inspect icmp

ASA(config-pmap-c)# exit

ASA(config)# service-policy icmp_policy interface outside


To Permanently save the ASA config in GNS3: 

copy running-config disk0:/.private/running-config
copy disk0:/.private/running-config disk0:/.private/startup-config
conf t
boot config disk0:/.private/startup-config


Understanding the Eight Basic Commands on a Cisco ASA Security Appliance

$
0
0

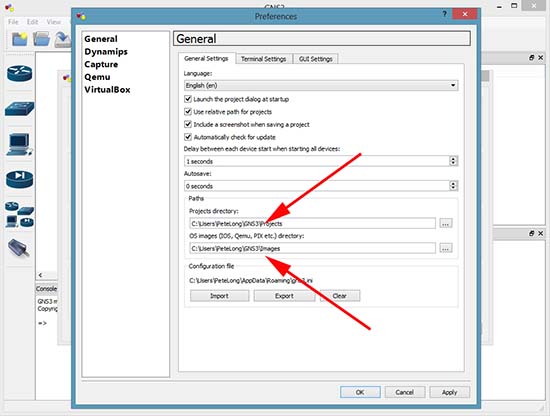
There are literally thousands of commands and sub-commands available to configure a Cisco security appliance.  As you gain knowledge of the appliance, you will use more and more of the commands.  Initially, however, there are just a few commands required to configure basic functionality on the appliance.  Basic functionality is defined as allowing inside hosts to access outside hosts, but not allowing outside hosts to access the inside hosts.  Additionally, management must be allowed from at least one inside host.  To enable basic functionality, there are eight basic commands (these commands are based on software version 8.3(1) or greater).

  • interface
  • nameif
  • security-level
  • ip address
  • switchport access
  • object network
  • nat
  • route

Sample Network Diagram

Cisco ASA Configuration Basic Diagram

interface

The interface command identifies either the hardware interface or the Switch Virtual Interface (VLAN interface) that will be configured.  Once in interface configuration mode, you can assign physical interfaces to switchports and enable them (turn them on) or you can assign names and security levels to VLAN interfaces.

nameif

The nameif command gives the interface a name and assigns a security level.  Typical names are outside, inside, or DMZ.

basic eight int nameif sec level ip add

security-level

Security levels are numeric values, ranging from 0 to 100, used by the appliance to control traffic flow.  Traffic is permitted to flow from interfaces with higher security levels to interfaces with lower security levels, but not the other way.  Access-lists must be used to permit traffic to flow from lower security levels to higher security levels.  The default security level for an outside interface is 0.  For an inside interface, the default security level is 100.  In the following sample configuration, the interface command is first used to name the inside and outside VLAN interfaces, then the DMZ interface is named and a security level of 50 is assigned to it.

ciscoasa(config)# interface vlan1
ciscoasa(config-if)# nameif inside
INFO: Security level for “inside” set to 100 by default.
ciscoasa(config-if)# interface vlan2
ciscoasa(config-if)# nameif outside
INFO: Security level for “outside” set to 0 by default.
ciscoasa(config-if)# interface vlan3
ciscoasa(config-if)# nameif dmz
ciscoasa(config-if)# security-level 50

ip address

The ip address command assigns an IP address to a VLAN interface either statically or by making it a DHCP client.  With modern versions of security appliance software, it is not necessary to explicitly configure default subnet masks.  If you are using non-standard masks, you must explicitly configure the mask, otherwise, it is not necessary.

In the following sample configuration, an IP address is assigned to VLAN 1, the inside interface.

ciscoasa(config-if)# interface vlan 1
ciscoasa(config-if)# ip address 192.168.106.1

In the following sample configuration, an interface VLAN 2, the outside interface is configured as a DHCP client.  The use of the statement “setroute” tells the appliance to get its default route from the DHCP server.

ciscoasa(config-if)# interface vlan 2
ciscoasa(config-if)# ip address dhcp setroute

Configuring interfaces on 55×0 appliances

Notice on the screen capture from a Cisco ASA 5540 security appliance that the nameif command is used to name physical interfaces instead of VLAN interfaces.
interface g01 configuration

switchport access

The switchport access command on the ASA 5505 security appliance assigns a physical interface to a logical (VLAN) interface.  In the next example, the interface command is used to identify physical interfaces, assign them to switchports on the appliance, and enable them (turn them on).  This command is not used on the ASA 55×0 appliances.

ciscoasa(config-if)# interface ethernet 0/0
ciscoasa(config-if)# switchport access vlan 2
ciscoasa(config-if)# no shutdown
ciscoasa(config-if)# interface ethernet 0/1
ciscoasa(config-if)# switchport access vlan 1
ciscoasa(config-if)# no shutdown

object network net-192.168.106

The object network net-192.168.106 statement creates an object called “net-192.168.106”.  (You do not have to name the object “net-192.168.106”; that is a descriptive name, but you could just as easily name it “Juan”.)  The network option states that this particular object will be based on IP addresses.  The subnet 192.168.106.0 255.255.255.0 command states that net-192.168.106 will affect any IP address beginning with 192.168.106.

ciscoasa(config-if)#object network net-196.168.106
ciscoasa(config-network-object)#subnet 192.168.106.0 255.255.255.0

nat

The nat statement, as shown below, tells the firewall to allow all traffic flowing from the inside to the outside interface  to use whatever address is dynamically (DHCP) configured on the outside interface.

ciscoasa(config)#nat (inside,outside) dynamic interface

route

The route command, in its most basic form, assigns a default route for traffic, typically to an ISP’s router.  It can also be used in conjunction with access-lists to send specific types of traffic to specific hosts on specific subnets.

In this sample configuration, the route command is used to configure a default route to the ISP’s router at 12.3.4.6.  The two zeroes before the ISP’s router address are shorthand for an IP address of 0.0.0.0 and a mask of 0.0.0.0.  The statement outside identifies the interface through which traffic will flow to reach the default route.

ciscoasa(config-if)# route outside 0 0 12.3.4.6

In place of the manual default route configuration, as mentioned previously, you could instead configure your outside interface as a DHCP client and include the “setroute” statement to obtain the default route from the ISP’s DHCP server.

The above commands create a very basic firewall.  A sophisticated firewall such as the Cisco ASA Security Appliance is capable of much greater functionality than what is shown here.  These commands, however, will provide a solid foundation for configuring additional services on your appliance.

Other commands you might use include hostname to identify the firewall, telnet or SSH to allow remote administration, DHCPD commands to allow the firewall to assign IP addresses to inside hosts, and static route and access-list commands to allow internal hosts such as DMZ Web servers or DMZ mail servers to be accessible to Internet hosts.  Of course, there are many more advanced commands that are explained in other how-to guides and in the book The Accidental Administrator: Cisco ASA Security Appliance: A Step-by-Step Configuration Guide.

Sample Base Configuration #1 (Static IP Address on Outside Interface)

ciscoasa(config)# interface vlan1
ciscoasa(config-if)# nameif inside
INFO: Security level for “inside” set to 100 by default.
ciscoasa(config-if)# interface vlan2
ciscoasa(config-if)# nameif outside
INFO: Security level for “outside” set to 0 by default.
ciscoasa(config-if)# interface ethernet 0/0
ciscoasa(config-if)# switchport access vlan 2
ciscoasa(config-if)# no shutdown
ciscoasa(config-if)# interface ethernet 0/1
ciscoasa(config-if)# switchport access vlan 1
ciscoasa(config-if)# no shutdown
ciscoasa(config-if)# interface vlan 2
ciscoasa(config-if)# ip address 12.3.4.5 255.255.255.0
ciscoasa(config-if)# interface vlan 1
ciscoasa(config-if)# ip address 192.168.106.1
ciscoasa(config-if)# route outside 0 0 12.3.4.6
ciscoasa(config-if)#object network net-192.168.106
ciscoasa(config-network-object)#subnet 192.168.106.0 255.255.255.0
ciscoasa(config)#nat (inside,outside) dynamic interface
ciscoasa(config)#exit

Note in the above configuration that the outside interface address and default route are configured manually.  If your appliance’s outside interface is connected to a network with a DHCP server, such as an ISP, you could configured interface VLAN2 as a DHCP client with the command “ip address dhcp setroute”.  The use of the “setroute” statement also eliminates the need for the manual default route configuration (route outside 0 0 12.3.4.6).

Sample Base Configuration #2 (DHCP-assigned IP Address on Outside Interface)

ciscoasa(config)# interface vlan1
ciscoasa(config-if)# nameif inside
INFO: Security level for “inside” set to 100 by default.
ciscoasa(config-if)# interface vlan2
ciscoasa(config-if)# nameif outside
INFO: Security level for “outside” set to 0 by default.
ciscoasa(config-if)# interface ethernet 0/0
ciscoasa(config-if)# switchport access vlan 2
ciscoasa(config-if)# no shutdown
ciscoasa(config-if)# interface ethernet 0/1
ciscoasa(config-if)# switchport access vlan 1
ciscoasa(config-if)# no shutdown
ciscoasa(config-if)# interface vlan 2
ciscoasa(config-if)# ip address dhcp setroute
ciscoasa(config-if)# interface vlan 1
ciscoasa(config-if)# ip address 192.168.106.1
ciscoasa(config-if)#object network net-192.168.106
ciscoasa(config-network-object)#subnet 192.168.106.0 255.255.255.0
ciscoasa(config)#nat (inside,outside) dynamic interface
ciscoasa(config)#exit


Windows Server 2012 DC, DNS and AD

CUCME/CME VBOX GNS3 IP Communicator basic LAB (VoIP)

Raspberry Pi (Model B+) (raspbian/openelec/xbmc)

Raspberry Pi Raspbmc/XBMC/OpenElec (Media Centre)

Nook HD Factory reset

Recommended size in percentage for each partition (Ubuntu / Linux)

$
0
0

I have seen most of dedicated hosting companies servers always have multiple partition for various folders. I have tried to follow some guide lines on my own on virtual box. I always use swap space as double the ram. let’s say

TS = total Size
SS = Swap Size
MS = Main Size

MS = TS - SS

What is bellow is percentage on MS.

/         20%
/boot     100M
/var      25%
/home     24%
/usr      10%
/tmp      200M
/opt      10%

it looks like I still need some key places I should give more space and some other places I should reduce space for example /usr and /var.

9.15.5. Recommended Partitioning Scheme

9.15.5.1. x86, AMD64, and Intel 64 systems

We recommend that you create the following partitions for x86, AMD64, and Intel 64 systems:
  • A swap partition
  • A /boot partition
  • A / partition
  • A home partition
  • A swap partition (at least 256 MB) — Swap partitions support virtual memory: data is written to a swap partition when there is not enough RAM to store the data your system is processing.
    In years past, the recommended amount of swap space increased linearly with the amount of RAM in the system. Modern systems often include hundreds of gigabytes of RAM, however. As a consequence, recommended swap space is considered a function of system memory workload, not system memory.
    The following table provides the recommended size of a swap partition depending on the amount of RAM in your system and whether you want sufficient memory for your system to hibernate. The recommended swap partition size is established automatically during installation. To allow for hibernation, however, you will need to edit the swap space in the custom partitioning stage.

    Table 9.2. Recommended System Swap Space

    Amount of RAM in the system Recommended swap space Recommended swap space if allowing for hibernation
    ⩽ 2GB 2 times the amount of RAM 3 times the amount of RAM
    > 2GB – 8GB Equal to the amount of RAM 2 times the amount of RAM
    > 8GB – 64GB 0.5 times the amount of RAM 1.5 times the amount of RAM
    > 64GB 4GB of swap space No extra space needed


    At the border between each range listed above (for example, a system with 2GB, 8GB, or 64GB of system RAM), discretion can be exercised with regard to chosen swap space and hibernation support. If your system resources allow for it, increasing the swap space may lead to better performance.
    Note that distributing swap space over multiple storage devices — particularly on systems with fast drives, controllers and interfaces — also improves swap space performance.

    Note

    Swap space size recommendations issued for Red Hat Enterprise Linux 6.0, 6.1, and 6.2 differed from the current recommendations, which were first issued with the release of Red Hat Enterprise Linux 6.3 in June 2012 and did not account for hibernation space. Automatic installations of these earlier versions of Red Hat Enterprise Linux 6 still generate a swap space in line with these superseded recommendations. However, manually selecting a swap space size in line with the newer recommendations issued for Red Hat Enterprise Linux 6.3 is advisable for optimal performance.
  • A /boot/ partition (250 MB)

    The partition mounted on /boot/ contains the operating system kernel (which allows your system to boot Red Hat Enterprise Linux), along with files used during the bootstrap process. For most users, a 250 MB boot partition is sufficient.

    Important — Supported file systems

    The GRUB bootloader in Red Hat Enterprise Linux 6.5 supports only the ext2, ext3, and ext4 (recommended) file systems. You cannot use any other file system for /boot, such as Btrfs, XFS, or VFAT.

    Warning

    Note that normally the /boot partition is created automatically by the installer. However, if the / (root) partition is larger than 2 TB and (U)EFI is used for booting, you need to create a separate /boot partition that is smaller than 2 TB to boot the machine successfully.

    Note

    If your hard drive is more than 1024 cylinders (and your system was manufactured more than two years ago), you may need to create a /boot/ partition if you want the / (root) partition to use all of the remaining space on your hard drive.

    Note

    If you have a RAID card, be aware that some BIOS types do not support booting from the RAID card. In cases such as these, the /boot/ partition must be created on a partition outside of the RAID array, such as on a separate hard drive.
  • A root partition (3.0 GB – 5.0 GB) — this is where “/” (the root directory) is located. In this setup, all files (except those stored in /boot) are on the root partition.
    A 3.0 GB partition allows you to install a minimal installation, while a 5.0 GB root partition lets you perform a full installation, choosing all package groups.

    Root and /root

    The / (or root) partition is the top of the directory structure. The /root directory (sometimes pronounced “slash-root”) is the home directory of the user account for system administration.
  • A home partition (at least 100 MB)

    To store user data separately from system data, create a dedicated partition within a volume group for the /home directory. This will enable you to upgrade or reinstall Red Hat Enterprise Linux without erasing user data files.

Many systems have more partitions than the minimum listed above. Choose partitions based on your particular system needs. Refer to Section 9.15.5.1.1, “Advice on Partitions” for more information.
If you create many partitions instead of one large / partition, upgrades become easier. Refer to the description of the Edit option in Section 9.15, “ Creating a Custom Layout or Modifying the Default Layout ” for more information.
The following table summarizes minimum partition sizes for the partitions containing the listed directories. You do not have to make a separate partition for each of these directories. For instance, if the partition containing /foo must be at least 500 MB, and you do not make a separate /foo partition, then the / (root) partition must be at least 500 MB.

Table 9.3. Minimum partition sizes

Directory Minimum size
/ 250 MB
/usr 250 MB, but avoid placing this on a separate partition
/tmp 50 MB
/var 384 MB
/home 100 MB
/boot 250 MB


Leave Excess Capacity Unallocated

Only assign storage capacity to those partitions you require immediately. You may allocate free space at any time, to meet needs as they occur. To learn about a more flexible method for storage management, refer to Appendix D, Understanding LVM.
If you are not sure how best to configure the partitions for your computer, accept the default partition layout.
9.15.5.1.1. Advice on Partitions
Optimal partition setup depends on the usage for the Linux system in question. The following tips may help you decide how to allocate your disk space.
  • Consider encrypting any partitions that might contain sensitive data. Encryption prevents unauthorized people from accessing the data on the partitions, even if they have access to the physical storage device. In most cases, you should at least encrypt the /homepartition.
  • Each kernel installed on your system requires approximately 10 MB on the /bootpartition. Unless you plan to install a great many kernels, the default partition size of 250 MB for /boot should suffice.

    Important — Supported file systems

    The GRUB bootloader in Red Hat Enterprise Linux 6.5 supports only the ext2, ext3, and ext4 (recommended) file systems. You cannot use any other file system for /boot, such as Btrfs, XFS, or VFAT.
  • The /var directory holds content for a number of applications, including the Apache web server. It also is used to store downloaded update packages on a temporary basis. Ensure that the partition containing the /var directory has enough space to download pending updates and hold your other content.

    Warning

    The PackageKit update software downloads updated packages to /var/cache/yum/ by default. If you partition the system manually, and create a separate /var/ partition, be sure to create the partition large enough (3.0 GB or more) to download package updates.
  • The /usr directory holds the majority of software content on a Red Hat Enterprise Linux system. For an installation of the default set of software, allocate at least 4 GB of space. If you are a software developer or plan to use your Red Hat Enterprise Linux system to learn software development skills, you may want to at least double this allocation.

    Do not place /usr on a separate partition

    If /usr is partitioned separately from the rest of the root volume, the boot process becomes much more complex because /usr contains boot-critical components. In some situations, such as when installing on an iSCSI drive, the system will not boot.
  • Consider leaving a portion of the space in an LVM volume group unallocated. This unallocated space gives you flexibility if your space requirements change but you do not wish to remove data from other partitions to reallocate storage.
  • If you separate subdirectories into partitions, you can retain content in those subdirectories if you decide to install a new version of Red Hat Enterprise Linux over your current system. For instance, if you intend to run a MySQL database in /var/lib/mysql, make a separate partition for that directory in case you need to reinstall later.
  • UEFI systems should contain a 50-150MB /boot/efi partition with an EFI System Partition filesystem.
The following table is a possible partition setup for a system with a single, new 80 GB hard disk and 1 GB of RAM. Note that approximately 10 GB of the volume group is unallocated to allow for future growth.

Example Usage

This setup is not optimal for all use cases.

Example 9.1. Example partition setup

Table 9.4. Example partition setup

Partition Size and type
/boot 250 MB ext3 partition
swap 2 GB swap
LVM physical volume Remaining space, as one LVM volume group
The physical volume is assigned to the default volume group and divided into the following logical volumes:

Table 9.5. Example partition setup: LVM physical volume

Partition Size and type
/ 13 GB ext4
/var 4 GB ext4
/home 50 GB ext4

Critical Error Failed to Create the VirtualBox COM object error and resolution

$
0
0

VirtualBox will not start and present a Critical Error dialog box which reads “Failed to create the VirtualBox COM object. The application will now terminate.” If you select Details for additional information, it may offer something similar to this error, if not the same, Callee RC: CO_E_SERVER_EXEC_FAILURE (0x80080005). Here is a solution that worked in this case and will get VirtualBox back up and running without losing any configuration changes.

I recognize this error will likely occur on multiple versions of this application, however, for the sake of disclosure, the error occured using Oracle VirtualBox 4.3.6 on a Microsoft Windows 7 Professional (64-bit). During the re-install, I elected to upgrade to the latest, at the time of this writing, Oracle VirtualBox 4.3.8.

virtualbox-criticalerror1

The Process

  • Navigate to your profile and look for the .VirtualBox folder. For example, C:\Users\your.name\.VirtualBox
  • Copy the VirtualBox.xml to somewhere safe, like your desktop
  • Uninstall VirtualBox
  • Delete the .VirtualBox folder
  • Re-install VirtualBox and the option package.
  • Start VirtualBox
  • Close VirtualBox
  • Navigate to your profile and look for the .VirtualBox folder. For example, C:\Users\your.name\.VirtualBox
  • Rename the VirtualBox.xml to VirtualBox.xml.old
  • Copy your original VirtualBox.xml to the .VirtualBox folder
  • Start VirtualBox

Note: If you are presented with a hardware error message of some sort, here the corrections may be made. In my case, there was a referenced hard disk that was unavailable. So I deleted it using the configuration window that was presented.

Everything should be working as expected.


Shellshock (bash vulnerability/bash bug)(Deadly serious’ new vulnerability found)(All OS X and Linux systems wide open)

$
0
0

A new vulnerability has been found that potentially affects most versions of the Linux and Unix operating systems, in addition to Mac OS X (which is based around Unix). Known as the “Bash Bug” or “ShellShock,” the GNU Bash Remote Code Execution Vulnerability (CVE-2014-6271) could allow an attacker to gain control over a targeted computer if exploited successfully.

The vulnerability affects Bash, a common component known as a shell that appears in many versions of Linux and Unix. Bash acts as a command language interpreter. In other words, it allows the user to type commands into a simple text-based window, which the operating system will then run.

Bash can also be used to run commands passed to it by applications and it is this feature that the vulnerability affects. One type of command that can be sent to Bash allows environment variables to be set. Environment variables are dynamic, named values that affect the way processes are run on a computer. The vulnerability lies in the fact that an attacker can tack-on malicious code to the environment variable, which will run once the variable is received.

Symantec regards this vulnerability as critical, since Bash is widely used in Linux and Unix operating systems running on Internet-connected computers, such as Web servers. Although specific conditions need to be in place for the bug to be exploited, successful exploitation could enable remote code execution. This could not only allow an attacker to steal data from a compromised computer, but enable the attacker to gain control over the computer and potentially provide them with access to other computers on the affected network.

The following video provides an explanation of the Bash Bug vulnerability and demonstrates how a likely attack scenario through the CGI interface may work:

Has it been exploited yet?
There are limited reports of the vulnerability being used by attackers in the wild. Proof-of-concept scripts have already been developed by security researchers. In addition to this, a module has been created for the Metasploit Framework, which is used for penetration testing.

Once the vulnerability has been made public, it was only a matter of time before attackers attempted to find and exploit unpatched computers.

How can it be exploited?
While the vulnerability potentially affects any computer running Bash, it can only be exploited by a remote attacker in certain circumstances. For a successful attack to occur, an attacker needs to force an application to send a malicious environment variable to Bash.

The most likely route of attack is through Web servers utilizing CGI (Common Gateway Interface), the widely-used system for generating dynamic Web content. An attacker can potentially use CGI to send a malformed environment variable to a vulnerable Web server. Because the server uses Bash to interpret the variable, it will also run any malicious command tacked-on to it.

shellshock-command-diagram-600px_v2.png
Figure 1. How a malicious command can be tacked-on to the end of a legitimate environment variable. Bash will run the malicious command first.

The consequences of an attacker successfully exploiting this vulnerability on a Web server are serious in nature. For example attackers may have the ability to dump password files or download malware on to infected computers. Once inside the victim’s firewall, the attackers could then compromise and infect other computers on the network.

Aside from Web servers, other vulnerable devices include Linux-based routers that have a Web interface that uses CGI. In the same manner as an attack against a Web server, it may be possible to use CGI to exploit the vulnerability and send a malicious command to the router.

Computers running Mac OS X are also potentially vulnerable until Apple releases a patch for the vulnerability. Again, attackers would need to find a way to pass malformed commands to Bash on the targeted Mac. The most likely avenue of attack against OS X would probably be through Secure Shell (SSH), a secure communications protocol. However, it appears that the attacker would need to have valid SSH credentials to perform the attack. In other words, they would already have to be logged in to an SSH session.

Internet of Things (IoT) and embedded devices such as routers may be vulnerable if they’re running Bash. However, many newer devices run a set of tools called BusyBox which offers an alternative to Bash. Devices running BusyBox are not vulnerable to the Bash Bug.

For website owners and businesses
Businesses, in particular website owners, are most at risk from this bug and should be aware that its exploitation may allow access to their data and provide attackers with a foothold on their network. Accordingly, it is of critical importance to apply any available patches immediately.

Linux vendors have issued security advisories for the newly discovered vulnerability including patching information.

*Red Hat has updated its advisory to include fixes for a number of remaining issues.

If a patch is unavailable for a specific distribution of Linux or Unix, it is recommended that users switch to an alternative shell until one becomes available.

For consumers
Consumers are advised to apply patches to routers and any other web-enabled devices as and when they become available from vendors. Users of Apple’s Mac OS X should be aware that the operating system currently ships with a vulnerable version of Bash. Mac users should apply any patches for OS X when they become available.

Symantec Protection
Symantec has created an Intrusion Prevention signature for protection against this vulnerability:

Symantec will continue to investigate this vulnerability and provide more details as they become available.


vSphere 5.5 – How to install and configure VMware ESXi 5.5

$
0
0

Realtek network cards and VMware ESXi 5.5

Yesterday I decided to upgrade my two ESXi servers from ESXi 5.1 to ESXi 5.5 since the update came out some time ago.
The upgrade from ESXi 5.0 to ESXi 5.1 went great, without any problems. But this time, that is not the case.

My two ESXi servers are white boxes made of the following hardware:

The problem was the motherboard that ships with an onboard Realtek 8111E network adapter.
This problem has been verified to be the same with Realtek 8168 and Realtek 8169.
The reason for this, is that VMware removed the drivers from the new ESXi 5.5 iso.

In this post I will show you how to get ESXi 5.5 working with the Realtek network adapters.

Some people don’t like to use “not supported” hardware this way, and others had connection problems on the VM’s after doing this. I did not have any problems, and have been running with this solution since I wrote this post (21 days ago now). So i think it is pretty stable.
If you don’t want to use the method below, you can always buy a Intel Pro 1000 network card and put it in a PCI-e slot.
I highly recommend the Intel pro 1000 series, they are fast, reliable and works on any OS out of the box (including ESXi), but they are a little pricy. You can get them here, with free shipping:
Intel Pro 1000 Dual port
Intel Pro 1000 single port

There are two ways to make the upgrade work on your motherboard:

  1. Using a supported network adapter in a PCI-E slot (See above, regarding the Intel Pro 1000 network adapters)
  2. Creating a custom ESXi 5.5 iso with the drivers from ESXi 5.1

Putting in a extra network adapter was not an option for me, so I went for option two, and here is how I did it:

Creating a custom ESXi 5.5 iso including the Realtek network drivers

What you need

You just need a Windows XP or higher computer, and the software below.

Getting the needed software

First you need to get the needed software.
The following is what you need to download:

Injecting the drivers and create a new iso file

There is not a lot of steps to this, actually just a couple and it will not take long.

Open the “Esxi-customizer”

First run the .exe for ESXi-customizer to extract it.
When extracted, run the program so you get the following window:
ESXi-Customizer_ESXi-5.5.0_r8168

Fill out fields

Simply fill out all 3 fields.
First one: Choose the original VMware ESXi 5.5 iso you downloaded from VMware
Second one: Choose the .VIB file for you Realtek network adapter that you downloaded earlier.
Third one: Choose what folder to use for working folder. A log and the finished new .iso file will be saved here. just create a new folder on your C:\ drive and use it.

If your motherboard support UEFI boot, you can tick the “Create UEFI bootable ISO” if not, then untick this. If you are unsure about this, then untick it!
Tick the auto update check to make sure you always have the latest version of this software.

Do it!

Let’s do it! Press “Run!”
The program will run some commands in the command promt behind it, and that’s it.
It does not take long. Once done, you can close the program.

Upgrade your VMware ESXi server

Now, burn your newly created ISO image of VMware ESXi 5.5 with your Realtek network adapter drivers injected that was created in the folder you choose to be the working folder for the program.
You can also “Burn” it to a usb stick, if your server does not have a optical drive installed. I do not have a guide for this yet.

Boot up your server on the cd/usb and choose to upgrade the system like you would with the original iso.

Note that the custom .iso does not work trough VMware Update Manager.

Feel free to leave a comment below, and rate the post at the top if this helped you!

Difference between vSphere, ESXi and vCenter

VMware Inc. is a software company that develops many suite of software products specially for providing various virtualization solutions. There are many cloud products, datacenter products,  desktop products and so on.

vSphere is a software suite that comes under data center product. vSphere is like Microsoft Office suite which has many software like MS Office, MS Excel, MS Access and so on. Like Microsoft Office, vSphere is also a software suite that has many software components like vCenter, ESXi, vSphere client and so on. So, the combination of all these software components is vSphere. vSphere is not a particular software that you can install and use, “it is just a package name which has other sub components”.

ESXi, vSphere client and vCenter are components of vSphere. ESXi server is the most important part of vSphere. ESXi is the virtualization server. It is type 1 hypervisor. All the virtual machines or Guest OS are installed on ESXi server. To install, manage and access those virtual servers which sit above of ESXi server, you will need other part of vSphere suit called vSphere client or vCenter. Now, vSphere client allows administrators to connect to ESXi servers and access or manage virtual machines. vSphere client is installed on the client machine (e.g. Administrator’s laptop). The vSphere client is used from client machine to connect to ESXi server and do management tasks. So now what is vCenter? Why we need it? Try cloning existing virtual machine using just a vSphere client without vCenter server.

vCenter server is similar to vSphere client but it’s a server with more power. vCenter server is installed on Windows Server or Linux Server. VMware vCenter server is a centralized management application that lets you manage virtual machines and ESXi hosts centrally. vSphere client is used to access vCenter Server and ultimately manage ESXi servers. vCenter server is compulsory for enterprises to have enterprise features like vMotion, VMware High Availability, VMware Update Manager and VMware Distributed Resource Scheduler (DRS). For example, you can easily clone existing virtual machine in vCenter server. So vCenter is another important part of vSphere package. You have to buy vCenter license separately.

Difference between vSphere, ESXi and vCenter

The diagram above shows vSphere suite in a more descriptive way. vSphere is a product suite, ESXi is a hypervisor installed on a physical machine. vSphere Client is installed on laptop or desktop PC and is used to access ESXi Server to install and manage virtual machines on ESXi server. vCenter server is installed as virtual machine on top of ESXi server. vCenter server is a vSphere component which is mostly used in large environment where there are many ESXi server and dozens of virtual machines. The vCenter server is also accessed by vSphere client for management purpose. So, vSphere client is used to access ESXi server directly in small environment. In larger environment, vSphere client is used again to access vCenter server which ultimately manages ESXi server.


How do I configure swappiness? (Swap file)

$
0
0

The Linux kernel provides a tweakable setting that controls how often the swap file is used, called swappiness

A swappiness setting of zero means that the disk will be avoided unless absolutely necessary (you run out of memory), while a swappiness setting of 100 means that programs will be swapped to disk almost instantly.

Ubuntu system comes with a default of 60, meaning that the swap file will be used fairly often if the memory usage is around half of my RAM. You can check your own system’s swappiness value by running:

one@onezero:~$ cat /proc/sys/vm/swappiness
60

As I have 4 GB of RAM, so I’d like to turn that down to 10 or 15. The swap file will then only be used when my RAM usage is around 80 or 90 percent. To change the system swappiness value, open /etc/sysctl.conf as root. Then, change or add this line to the file:

vm.swappiness = 10

Reboot for the change to take effect

You can also change the value while your system is still running

sysctl vm.swappiness=10

you can also clear your swap by running swapoff -a and then swapon -a as root instead of rebooting to achieve the same effect.

To calculate your swap Formula

free -m (total) / 100 = A

A * 10

root@onezero:/home/one# free -m
             total       used       free     shared    buffers     cached
Mem:          3950       2262       1687          0        407        952
-/+ buffers/cache:        903       3047
Swap:         1953          0       1953

so total is 3950 / 100 = 39.5 * 10 = 395

so what it mean is that when 10 % 395 MB of ram left then it start using swapiness


                                          Help . Ubuntu . Swap

                                           What is swappiness

The swappiness parameter controls the tendency of the kernel to move processes out of physical memory and onto the swap disk. Because disks are much slower than RAM, this can lead to slower response times for system and applications if processes are too aggressively moved out of memory.

.     swappiness can have a value of between 0 and 100

.     swappiness=0 : Version 3.5 and over: disables swapiness. Prior to 3.5: tells the kernel to avoid swapping processes out of physical memory for as long as possible.

.     swappiness=1 : Version 3.5 and over: Minimum swappiness without disabling it entirely

.     swappiness=100 tells the kernel to aggressively swap processes out of physical memory and move them to swap cache

See http://en.wikipedia.org/wiki/Swappiness

The default setting in Ubuntu is swappiness=60. Reducing the default value of swappiness will probably improve overall performance for a typical Ubuntu desktop installation. A value of swappiness=10 is recommended, but feel free to experiment.


Started Using swap at 91%

enter image description here As I have configured my system & vm to make use of ram at 90 % . At 90 % there was no swapping

after that I opened some application like Firefox & Shutter , its start swapping because of ram usage is above 90 %


How to Boot from USB in VirtualBox

How to Install and Start Teamviewer in Ubuntu 14.04 13.10

Viewing all 174 articles
Browse latest View live