Quantcast
Channel: Network and Security Professional
Viewing all 174 articles
Browse latest View live

Top Things To Do After Installing Ubuntu 14.04/13.10/13.04/12.10/12.04

$
0
0

Ubuntu 14.04 LTS and  its official flavours have been released a couple of days before. In this brief how-to, let us discuss how we can enhance Ubuntu 14.04 and other older versions further for day to day activities. This post we will share some interesting insights and ideas about what you can and should do after a successful installation of Ubuntu.

If you have already a previous release of Ubuntu, and want to upgrade to the latest 14.04 version, then please follow our step by step guide upgrade to Ubuntu 14.04 Trusty Tahr.

First of all, after fresh installation of Ubuntu 14.04 Trusty, check the following few things first.

If sound is not working, check our previous post to resolve the issue.

1. Update System

Before proceeding to upgrade, the first and important thing to do is update/upgrade software repositories and make sure your systems contains latest versions of all software.

sudo apt-get update && sudo apt-get upgrade

2. Configure And Tweak Ubuntu

2.1 Disable Unity Dash Online Search feature

Whenever, you start typing in Unity Dash to search for an application or a file in your computer, your search terms will be automatically sent to third parties such as Amazon, and the third parties will display the relevant results (mostly ads) depending upon your search terms. If you don’t like this feature and feel this is really annoying to you, you can disable it.

Read the more details in the following link.

2.2 Ubuntu Tweak

Ubuntu Tweak is a must have application for Ubuntu and it’s derivatives. It is an application to configure Ubuntu easier for everyone. It provides many useful desktop and system options that the default desktop environment doesn’t provide. Using Ubuntu Tweak you can install all needed applications with a simple click, you can change the window buttons from Left to right…etc.

Install Ubuntu Tweak

Read our previous to know how to install and use Ubuntu Tweak.

2.3 Ubuntu After Install

Like Ubuntu Tweak, there is an another similar tool called “Ubuntu After install” available. Ubuntu After Install is a tool that can be used to install some of the best and essential software after installing the Ubuntu desktop. It has a bunch of useful applications, and will automate the installation process on a newly installed machine to get near perfect desktop. I would not say a complete desktop for all users, but a near perfect desktop. This tool saves your time and effort, and installs all latest versions of softwares by automatically adding the respective PPA’s to keep the installed softwares up to date on your Ubuntu system.

For more details about installation and usage of Ubuntu After Install Check out the following link.

The above two tools are enough to get a near perfect Ubuntu desktop for daily usage. These tools will help you to install every essential applications and tweak your system as per your needs for daily usage. You can omit all other things given below. Still you want to continue, go on and check them.

3. Desktop Environments

3.1 Cinnamon

Cinnamon is a GNOME 3 fork that allow you to have a panel at the bottom with a classic Menu, this is useful for people that want to use Ubuntu with a classic Bottom Menu.

Cinnamon latest version for Ubuntu 14.04 is not yet ported to the stable PPA, however we can install it using nightly builds which is not recommended for the production system.

If you want to install the most recent version of cinnamon, then follow the steps below.

sudo add-apt-repository ppa:gwendal-lebihan-dev/cinnamon-nightly
sudo apt-get update
sudo apt-get install cinnamon

Logout from the current session and select Cinnamon as your desktop session at the user login prompt. Now you’ll able to get the Cinnamon Desktop Environment.

Menu_009

3.2 Gnome

To install GNOME 3 in Ubuntu 14.04, enter the following command:

sudo apt-get install gnome-shell ubuntu-gnome-desktop

During installation, the installer will ask you to select the login manager of your choice (LightDM is the default Unity manager and GDM is the GNOME default — Both will work).

4. Configure Online Accounts

One of the top things you need to do is to setup your online accounts (Facebook, twitter…). To do that click on the gear button on the top right corner and select System Settings.

Menu_005

Then, select Online Accounts (see below).

System Settings_006

Now setup your online accounts and get notifications in Ubuntu. For example, if you want to add your Facebook account, click on the Facebook icon.

Online Accounts_007

Enter your facebook username and password, and click Log in to authorize.

Online Accounts_009

5. System Monitoring & Eye Candy Tools

5.1 Conky

Conky is a free, light-weight system monitor for X, that displays any information on your desktop. There are many nice themes available for conky that can display clock, CPU usage, RAM usage, swap, disk, net and more. Check our previous post for installation and configuration of conky in Ubuntu 14.04/13.10/13.04/12.10/12.04.

5.2 Don’t like the default icons, Wanna try some cool icons?

Try the following cool Icon collections.

Want to change the default icons to something that match your taste? Check this nice collection of icons for Ubuntu (PPA included).

6. Multimedia

6.1 VLC Media Player

VLC is the best media player for Linux it play almost everything, it has many features that you can not find in any other media player, read this post if you want to know what VLC can do: 25 things you can do with VLC Media player!

You can install VLC from Ubuntu Software Center or via terminal by using the following command:

sudo apt-get install vlc

Or install the most recent version 2.1.1 using the following PPA.

sudo add-apt-repository ppa:videolan/stable-daily
sudo apt-get update
sudo apt-get install vlc

6.2 XMBC

XBMC is an award-winning free and open source (GPL) software media player and entertainment hub for digital media. XBMC is available for Linux, OS X, Windows, and the original Xbox. While XBMC functions very well as a standard media player application for your computer, it has been designed to be the perfect companion for your HTPC. Supporting an almost endless range of remote controls, and combined with its beautiful interface and powerful skinning engine, XBMC feels very natural to use from the couch and is the ideal solution for your home theater.

Open terminal and copy the following commands:

sudo apt-get install xbmc

6.3 Openshot video editor

My favorite Video editor is Openshot, the best existing actually for Linux. You can install Openshot from Ubuntu Software Center, but if you want to install the latest release, you can do that by adding the following repositories:

Note: PPA is not yet working in 13.10 at the time of writing this article. Hope it will be updated soon.

sudo add-apt-repository ppa:openshot.developers/ppa
sudo apt-get update
sudo apt-get install openshot openshot-doc

6.4 Handbrake

Check our previous article to know about the powerful video encoder called “Handbrake”.

7. Install Common Codecs And Enable DVD playback

Perhaps, installing a few common codecs might give you better playback for your media files.

sudo apt-get install gstreamer0.10-plugins-ugly libxine1-ffmpeg gxine mencoder libdvdread4 totem-mozilla icedax tagtool easytag id3tool lame nautilus-script-audio-convert libmad0 mpg321 gstreamer1.0-libav

To play encrypted DVDs, the libdvdcss2 package is essential. libdvdcss is a simple library designed for accessing DVDs like a block device without having to bother about the decryption.

sudo /usr/share/doc/libdvdread4/./install-css.sh

7.1 Enable Flash Support On Browsers

For Ubuntu 32 bit & 64 bit: To be able to watch some videos and see flash website in your browser (Firefox/Chrome), you need to install flash plugin, go to Ubuntu Software Center and search word “flash” and install it.

Alternatively enter the following command to install flash plugins.

sudo apt-get install flashplugin-installer

8. Torrent Softwares

8.1 uTorrent

uTorrent is a lightweight and efficient BitTorrent client for Linux, Windows OS and Mac OS. The installation of uTorrent in Linux is different from Windows and Mac OS. In Linux, uTorrent runs as a web server. You will access uTorrent from your browser. You should start the uTorrent server in order to access it from your browser.

Check our previous article to know more about uTorrent.

8.2 Deluge

The Deluge application was designed to be a full-featured torrent client. Deluge uses libtorrent in its back-end and PyGTK for its user interface and is currently usable on POSIX-compliant operating systems. It is intended to bring a native, full-featured client to GTK desktop environments such as GNOME and Xfce. An official Windows port is also available.

Open terminal and type the following commands:

sudo apt-get install deluge

9. Messengers

Here is the list of recommended Messengers for your system. Don’t install everything. Install one by one and pick up the right one for your requirement and delete the rest.

9.1 Pidgin

The best messenger client and 30 plugins, you can do voice and video chat with friends.

To install Pidgin, enter the following command:

$ sudo apt-get install pidgin

9.2 aMSN

aMSN is a free windows Live Messenger clone. aMSN attempts to emulate the look and feel of Windows Live Messenger, and supports many of its features.

aMSN has many features which are not present in Windows Live Messenger. Users can set alarms, are able to see others who have removed them from their contact list, and are able to open many profiles at once. It is also very customizable, with extensions and themes available at the main site.

To install aMsn, enter the following command in your terminal.

$ sudo apt-get install amsn

9.3 Skype

If you’re want to install Skype, check our previous post.

9.4 Jitsi

Jitsi is an open source and multi platform audio/video Internet phone and instant messenger written in Java. It supports some of the most popular instant messaging and telephony protocols such as SIP, Jabber/XMPP (and hence Facebook and Google Talk), AIM, ICQ, MSN, Yahoo! Messenger.

For details about Jitsi please check our previous article in the following link.

10. Gaming & Emulators

10.1 Steam

As you may know, Steam is an ultimate gaming platform developed by Valve corporation. Steam is available for GNU Linux, Mac OS X and Windows. Recently, Valve has developed and released SteamOS, a Linux based distribution built around Steam client. You can either download and install SteamOS on your system, or just download and install the steam client to play games on your existing operating system.

To install Steam On Ubuntu 14.04, enter the following command:

sudo apt-get install steam

Click Ok to continue.

sk@sk: ~_008

Accept the License agreement.

sk@sk: ~_009

Now, the steam will be installed on your system. Launch it either from Dash or Menu.

Menu_010

At the first launch, Steam will check for updates and download and install them if updates available.

Steam_011

After updating Steam, you can enter into steam and start playing games.

Steam_012

If you don’t have an account, create it using the CREATE NEW ACCOUNT link.

This is how my Steam dashboard looks.

Steam_013

10.2 Gaming made easy with Playdeb

If you are a grate fan of gaming so is important to add PlayDeb repositories to your Lucid Lynx. PlayDeb is a gaming repository for Ubuntu aimed to provide titles already available on getdeb.net in an easier to install and update format. You can install many games by a simple click.

10.3 Wine

Wine enables Linux, Mac, FreeBSD, and Solaris users to run Windows applications without a copy of Microsoft Windows. Wine is free software under constant development. Other platforms may benefit as well.

sudo apt-get install wine

Or

Please follow instructions in our previous post.

11. Sharing Files/Folders

11.1 Samba

In order to share folders in Raring Ringtail with other Linux and windows machines in your network, you will need to install and configure Samba share, for instructions how to configure Samba in Ubuntu check our previous post.

11.2 Gigola

Gigola is an another option to share files between Linux and Windows systems. Unlike Samba, we can use Gigola to send files between Linux-to-Linux and Linux-to-Windows systems.

Learn more about Gigola from the below link.

12. Extras & Miscellaneous

12.1 Install Archive Management Apps

Install the following packages will allow you to deal with almost all and any zip formated files.

sudo apt-get install unace unrar zip unzip p7zip-full p7zip-rar sharutils rar uudeview mpack arj cabextract file-roller

12.2 Y PPA Manager

Y PPA Manager is a GUI tool to easily add PPAs, search a package in all Launchpad PPAs, remove duplicate PPAs (only works with separate .list files), backup PPAs and other PPA-related tasks. Check out the Launchpad page for a complete features list.

sudo add-apt-repository ppa:webupd8team/y-ppa-manager
sudo apt-get update
sudo apt-get install y-ppa-manager

Y-PPA-Manager can be launched either from Dash or Menu.

12.3 Install Java 7

Java is fast, secure, and reliable programming and computing platform. There are lots of applications and websites that will not work unless you have Java installed, and more are created every day. To install java simply run the following command from your terminal.

sudo apt-get install openjdk-7-jdk

If you want to try oracle-java 7, try the following steps.

First you need to remove OpenJDK for this run the following command from your terminal:

sudo apt-get purge openjdk*

Now you can install Java 7 by adding the following repository:

sudo add-apt-repository ppa:webupd8team/java
sudo apt-get update
sudo apt-get install oracle-java7-installer

To remove Java 7, run this in terminal:

 sudo apt-get remove oracle-java7-installer

12.4 FileZilla

Filezilla is one of the best ftp client for Linux.

Install it via command line:

sudo apt-get install filezilla

12.5 Dropbox

Dropbox is a free service that lets you bring all your photos, docs, and videos anywhere. This means that any file you save to your Dropbox will automatically save to all your computers, phones and even the Dropbox website. Dropbox also makes it super easy to share with others, whether you’re a student or professional, parent or grandparent.

Download the Dropbox package

12.6 Oracle VirtualBox

If you want to run another OS in a virtual machine, install Virtualbox.

For installation, follow the instructions in our previous post.

12.7 Cheese: Web Cam Software

Cheese uses your webcam to take photos and videos, applies fancy special effects and lets you share the fun with others. To install cheese on your Ubuntu desktop, enter the following command:

sudo apt-get install cheese

12.8 digikam

digiKam is an advanced digital photo management application for Linux, Windows, and Mac-OSX. It can be used by Photographers to view, manage, edit, enhance, organize, tag, and share photographs under Linux systems.

You can easily install it using command:

sudo apt-get install digikam

12.9 Gimp

Regardless of whether you need to edit images daily on a professional level or just a hobbyist, GIMP is an essential tool for all.

sudo apt-get install gimp gimp-data gimp-plugin-registry gimp-data-extras

12.10 Install Compiz

To install Compiz use the following command:

sudo apt-get install compiz compizconfig-settings-manager compiz-plugins

13. Desktop Effects

Want to spice-up your desktop with awesome wallpapers, well you can use the following two programs to change your desktop wallpapers in a particular interval.

13.1 Variety

Variety is a wallpaper changer for Ubuntu which is feature-full, yet slim and very easy to use. It can automatically download wallpapers from various online sources such as Flickr, Wallbase.cc, World sunlight map (a live wallpaper that changes as the day progresses), Wallpapers.net, NASA Astronomy Picture of the Day, Desktoppr.co etc. It allows rotating them on a regular interval or on demand, and provides easy to use ways to separate the great images from the junk.

To install it under Ubuntu follow our previous post instructions.

13.2 Wallch

Wallch is an application that can be used to change your Ubuntu (Ubuntu derivatives) desktop wallpapers automatically at a particular period of time. It supports Gnome and Unity. It also let you to stop/start wallch, change to next/previous wallpaper. You can adjust/change the wallpaper changing interval. Wallch supports live Earth wallpapers which updates automatically every half an hour, therefore you can set the live Earth wallpapers as your desktop background.

To install it under Ubuntu follow our previous post instructions.

14. Other worth trying applications

14.1 App Grid

App Grid is a light weight alternative for Ubuntu Software Center. It allows you to filter applications by installed, pending, categories, name and rating. It is released under proprietary license and is available for Ubuntu 12.04, 12.10, 13.04 and 13.10.

For more details about App Grid, check our previous article in the following link.

14.2 Boot UP Manager(BUM)

Boot-Up Manager is a Perl-Gtk2 application to manage runlevels configuration of any Ubuntu/Debian derivative systems. Using this program we can easily start and stop boot-up scripts, without the necessity to handle through complex symbolic links and permissions.

For more details about BUM, check our previous article in the following link.

14.3 TLP: Improve Battery performance

TLP is an advanced power management tool for Linux that gives the settings and tweaks to enhance your existing power management automatically without the need to know every technical details. It is purely a command-line tool and doesn’t have a GUI. It should work on almost all laptops.

For more details about TLP, check our previous article in the following link.

14.4 BleachBit: Clean up your system

BleachBit deletes the unnecessary files, free up cache, delete cookies, clear internet history, shred temporary files, delete logs, and discard junk you didn’t know was there. This tool can be used in both Windows OS and Linux systems. And it will support the following applications such as Firefox, Internet Explorer, Adobe Flash, Google Chrome, Opera, Safari and more. It not only deletes the files, but it includes some advanced features such as shredding files to prevent recovery, wiping free disk space to hide traces of files deleted by other applications, and vacuuming Firefox to make it faster.

For more details about BleachBit, check our previous article in the following link.

14.5 Timeshift

Timeshift a application that provides functionality similar to the System Restore feature in Windows and the Time Machine tool in Mac OS. TimeShift protects your system by taking incremental snapshots of the file system at regular intervals. These snapshots can be restored later to bring your system to the exact state it was in at the time when the snapshot was taken.

For more details, refer the following link.

14.5 TypeCatcher

TypeCatcher is an Open Source application developed by Andrew Starr-Bochicchio. It allows you to easily download and install Google webfonts for off-line use.

For more details, refer the following link.

14.6 Apt-fast

Apt-fast is a “shell script wrapper” for apt-get and aptitude that can drastically improve APT download times by downloading packages with multiple connections per package. apt-fast uses aria2c or axel download managers to speed up the APT download time. Just like the traditional apt-get package manager, apt-fast supports almost all apt-get functions such as install, remove, update,upgrade, dist-upgrade etc. And one more notable feature is it supports proxy too.

The installation and usage instructions can be found in the following link.

14.7 Apt-proz & ProZilla

apt-proz is a shell script similar to apt-fast that increases the download speed of apt-get and aptitude by many times (at least for the developer!). While apt-fast uses Axel or aria2c download manager, apt-proz uses ProZilla download accelerator instead.

ProZilla is a full featured command line download accelerator for Linux operating systems. It downloads a files by splitting into multiple pieces and downloads them simultaneously form multiple connections. It supports pause/resume, http/ftp protocols.

You can find more details of the above tools in the following link.

Also install the following useful software’s if you like.

  • Opera – The fastest browser on Earth is even faster. But that is not all. Use Opera Turbo to double your page-download speed on slow connections.
  • Google Earth – Travel to cities across the globe, dive into the depths of the ocean, explore remote islands or even fly to faraway galaxies.

Now you’ve reached the end of the article. At this stage, you’ll have a perfect and full fledged Ubuntu 14.04 Desktop.

Do you have any extra softwares to this list? Please share them. We will include them if possible.

Cheers!!


How to install VMware Workstation on Ubuntu

How to install Skype on Ubuntu Linux x64/x32 bit

How to Install Cinnamon 2.2 in Ubuntu 14.04 LTS (Similar to Windows7 Desktop Environment)

How to speed up Ubuntu using Preload

7 Ways to Speed Up Ubuntu

Pfsense (Firewall and Web Filtering) features overview

How To Watch Netflix on Ubuntu The Easy Way

$
0
0

How To Watch Netflix on Ubuntu The Easy Way

Switch Chrome User Agent To Watch Netflix Natively in Linux

Native Netflix Linux playback can be enabled in the latest beta and development builds of Google Chrome — noWine-wrapped Silverlight plugin required.

The day those of us on Linux could log into the world’s most popular video streaming service, and watch movies and TV shows without having to jump through hoops, has been long overdue.

Netflix do not currently provide, offer or support any “official” way to watch content from their service on Ubuntu, Fedora or any other desktop Linux distribution. Subscribers have to use a supported platform, like Windows, Chrome OS or Android, or wrestle with a Wine-based workaround, the successes of which can vary from person to person.

Until now, that is.

netflix ubuntu

Why It Works Now: DRM

It’s now possible to stream video content from Netflix on a Linux desktop natively in recent development builds of Google Chrome. How?

Earlier this year the web standards body the ‘World Wide Web Consortium’ (commonly known as the W3C) controversially pushed forward with plans to introduce support for protected content (‘DRM’) through HTML5 Video through the Encrypted Media Extension specification.

Google describes EME as “a JavaScript API that enables web applications to interact with DRM systems, in order to allow playback of encrypted media.” This works without the need to hand off to or make use of bloated third-party plugins like Silverlight or Adobe Flash.

Back in June Netflix announced support for HTML5 video playback on Windows 8.1 and Safari (Yosemite only) using EME. With Google being one of the chief backers of this plugin-free DRM approach, Chrome natively supports EME.

Put two and two together and you get…showtime!
By spoofing the user agent of an official supported EME platform (e.g., Windows 8.1) in Chrome for Linux we can get fuss-free totally native playback of movies and TV shows — for now, at least.

And while few of us like ‘Digital Rights/Restrictions Management’, most of us have come to accept that until the entertainment conglomerates devout in their pursuit of its use move with the times, we don’t have an awful lot of leeway. We have the choice to push back in choosing more open alternatives, but until then we can at least commit begrudgingly.

How To Watch Netflix on Linux

‘It’s not quite as easy as opening Netflix and hitting play, but it is easier than adding PPAs’

For Google Chrome users on Ubuntu this means you can, albeit with a little bit of extra tweaking, get Netflix video to play on Linux. No plugins, PPAs, no glasses of Wine needed. It’s not quite as easy as opening Netflix and hitting play, but it is easier than adding PPAs to download and configure boatloads of Windows dependencies, muddying up your install.

On to the part you came here for: how to get it working. The steps that follow are not as complex or as numerous as they appear at first glance. I’m simply walking you through each part by hand.

Prerequisites:

  • Ubuntu 14.04 LTS* or 14.10 Alpha
  • Google Chrome Beta or Dev (v37+)
  • An active Netflix subscription or trial
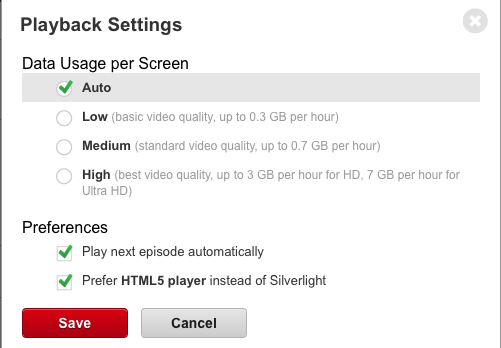
  • Have ‘Prefer HTML5‘ selected in ‘Netflix Account > Playback’

Get Chrome

As discovered by Nathan VanCamp on Google+ (via Phoronix) we can use User Agent String spoofing to fool Netflix into using EME-based playback on Linux.

netflix html5 settings

The process doesn’t work first time for everyone who tries it, with some still seeing ‘Install Silverlight’ prompts, or ‘Aww, Snap!’ screens. Your own milage may vary.

So, first steps: you need to use Chrome Beta or Dev. Don’t stamp your feet, or try this in a stable build; you have to use the latest beta or dev build of Google Chrome for Linux for this to work.

Getting Google Chrome for Linux on either channel (in both 32-bit and 64-bit) is simple enough: just grab the appropriate installer from the links below. Note: this will upgrade your existing stable installation.

Download Google Chrome Beta Download Google Chrome Dev

Ubuntu 14.04 LTS Only

If you’re attempting this how-to on Ubuntu 14.04 LTS you must also upgrade your version of ‘libnss3′ to a more recent version.

libnss3 files for Ubuntu 14.04 LTS (32bit)  libnss3 files for Ubuntu 14.04 LTS (64bit)

Download the appropriate zip archive from those linked above, extract it, then move the three .deb files inside to your home folder. Open a new Terminal window and enter the following command:

sudo dpkg -i libnss3*

User Agent Extension

With everything ready the last step is to modify the user-agent string of the browser to pretend we’re accessing Netflix from a platform it likes.

Modifying the UA string can be done in a number of ways but the easiest way is to install the free User-Agent Switcher Extension from the Chrome Web Store:

User Agent Switcher Extension for Chrome

Installing this will place new icon in the right of the Chrome toolbar. Right-click on this item and select ‘Options’. We’ll now add the required HTTP agent with the following string (thanks to Mat Enders for these steps):

  • Name: Netflix Linux
  • String: Mozilla/5.0 (Windows NT 6.3; Win64; x64) AppleWebKit/537.36 (KHTML, like Gecko) Chrome/38.0.2114.2 Safari/537.36
  • Group: (is filled in automatically)
  • Append?: Select ‘Replace’
  • Flag: IE

If you fill this in correctly you should have something like this:

netflix-user-agent-spoof

Click the ‘Add’ button at the far end to save your UA.

Now, load ‘netflix.com‘ in a new tab, and click the User-Agent Switcher toolbar icon, click ‘Chrome’ and select the ‘Netflix Linux’ entry. This will reload the page.

Optionally, you can set a permanent spoof rule to force this user-agent to take effect when loading Netflix:

netflix-user-agent-rule

Following that, you should be able to go to Netflix and begin playing your favourite films or TV shows.

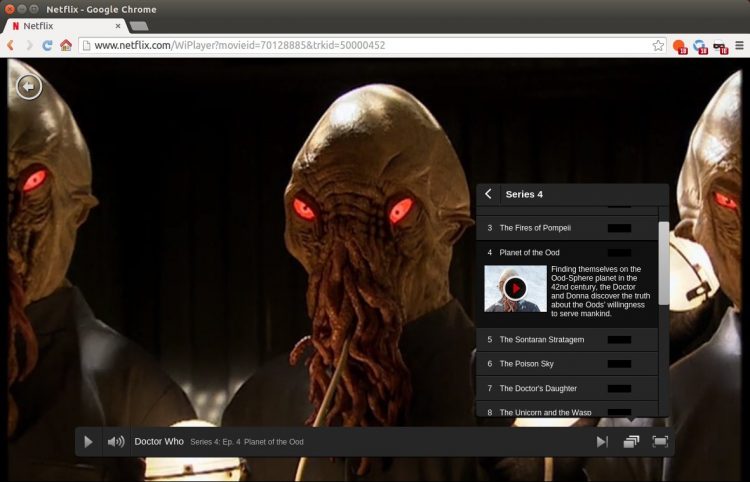
With the new UA in effect simply load up a video and…


How to install vmware workstation on Ubuntu

20 Command Line Tools to Monitor Linux Performance

$
0
0

It’s really very tough job for every System or Network administrator to monitor and debug Linux System Performance problems every day. After being a Linux Administrator for 5 years in IT industry, I came to know that how hard is to monitor and keep systems up and running. For this reason, we’ve compiled the list of Top 20 frequently used command line monitoring tools that might be useful for every Linux/Unix System Administrator. These commands are available under all flavors of Linux and can be useful to monitor and find the actual causes of performance problem. This list of commands shown here are very enough for you to pick the one that is suitable for your monitoring scenario.

1. Top – Linux Process Monitoring

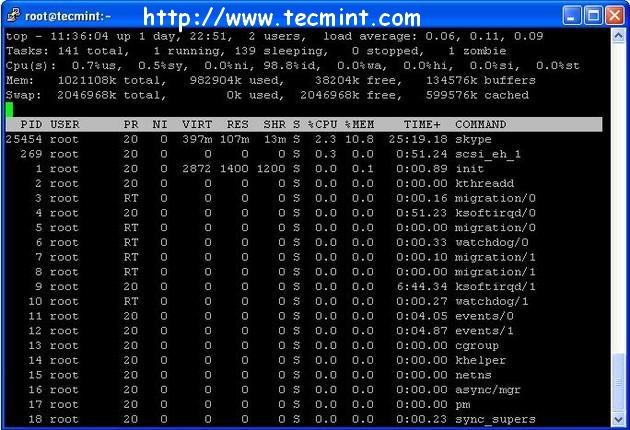
Linux Top command is a performance monitoring program which is used frequently by many system administrators to monitor Linux performance and it is available under many Linux/Unixlike operating systems. The top command used to dipslay all the running and active real-time processes in ordered list and updates it regularly. It display CPU usage, Memory usage, Swap Memory, Cache Size, Buffer Size, Process PID, User, Commands and much more. It also shows high memory and cpu utilization of a running processess. The top command is much userful for system administrator to monitor and take correct action when required. Let’s see top command in action.

# top
Top Command Example

Top Command Example

For more examples of Top command read : 12 TOP Command Examples in Linux

2. VmStat – Virtual Memory Statistics

Linux VmStat command used to display statistics of virtual memory, kernerl threads, disks,system processes, I/O blocks, interrupts, CPU activity and much more. By default vmstat command is not available under Linux systems you need to install a package called sysstat that includes a vmstat program. The common usage of command format is.

# vmstat

procs -----------memory---------- ---swap-- -----io---- --system-- -----cpu-----
 r  b   swpd   free  inact active   si   so    bi    bo   in   cs us sy id wa st
 1  0      0 810420  97380  70628    0    0   115     4   89   79  1  6 90  3  0

For more Vmstat examples read : 6 Vmstat Command Examples in Linux

3. Lsof – List Open Files

Lsof command used in many Linux/Unix like system that is used to display list of all the open files and the processes. The open files included are disk files, network sockets, pipes, devices andprocesses. One of the main reason for using this command is when a disk cannot be unmounted and displays the error that files are being used or opened. With this commmand you can easily identify which files are in use. The most common format for this command is.

# lsof

COMMAND     PID      USER   FD      TYPE     DEVICE     SIZE       NODE NAME
init          1      root  cwd       DIR      104,2     4096          2 /
init          1      root  rtd       DIR      104,2     4096          2 /
init          1      root  txt       REG      104,2    38652   17710339 /sbin/init
init          1      root  mem       REG      104,2   129900     196453 /lib/ld-2.5.so
init          1      root  mem       REG      104,2  1693812     196454 /lib/libc-2.5.so
init          1      root  mem       REG      104,2    20668     196479 /lib/libdl-2.5.so
init          1      root  mem       REG      104,2   245376     196419 /lib/libsepol.so.1
init          1      root  mem       REG      104,2    93508     196431 /lib/libselinux.so.1
init          1      root   10u     FIFO       0,17                 953 /dev/initctl

More lsof command usage and examples : 10 lsof Command Examples in Linux

4. Tcpdump – Network Packet Analyzer

Tcpdump one of the most widely used command-line network packet analyzer or packets snifferprogram that is used capture or filter TCP/IP packets that received or transferred on a specific interface over a network. It also provides a option to save captured packages in a file for later analysis. tcpdump is almost available in all major Linux distributions.

# tcpdump -i eth0

tcpdump: verbose output suppressed, use -v or -vv for full protocol decode
listening on eth0, link-type EN10MB (Ethernet), capture size 96 bytes
22:08:59.617628 IP tecmint.com.ssh > 115.113.134.3.static-mumbai.vsnl.net.in.28472: P 2532133365:2532133481(116) ack 3561562349 win 9648
22:09:07.653466 IP tecmint.com.ssh > 115.113.134.3.static-mumbai.vsnl.net.in.28472: P 116:232(116) ack 1 win 9648
22:08:59.617916 IP 115.113.134.3.static-mumbai.vsnl.net.in.28472 > tecmint.com.ssh: . ack 116 win 64347

For more tcpdump usage read : 12 Tcpdump Command Examples in Linux

5. Netstat – Network Statistics

Netstat is a command line tool for monitoring incoming and outgoing network packets statistics as well as interface statistics. It is very useful tool for every system administrator to monitor network performance and troubleshoot network related problems.

# netstat -a | more

Active Internet connections (servers and established)
Proto Recv-Q Send-Q Local Address               Foreign Address             State
tcp        0      0 *:mysql                     *:*                         LISTEN
tcp        0      0 *:sunrpc                    *:*                         LISTEN
tcp        0      0 *:realm-rusd                *:*                         LISTEN
tcp        0      0 *:ftp                       *:*                         LISTEN
tcp        0      0 localhost.localdomain:ipp   *:*                         LISTEN
tcp        0      0 localhost.localdomain:smtp  *:*                         LISTEN
tcp        0      0 localhost.localdomain:smtp  localhost.localdomain:42709 TIME_WAIT
tcp        0      0 localhost.localdomain:smtp  localhost.localdomain:42710 TIME_WAIT
tcp        0      0 *:http                      *:*                         LISTEN
tcp        0      0 *:ssh                       *:*                         LISTEN
tcp        0      0 *:https                     *:*                         LISTEN

More Netstat examples : 20 Netstat Command Examples in Linux.

6. Htop – Linux Process Monitoring

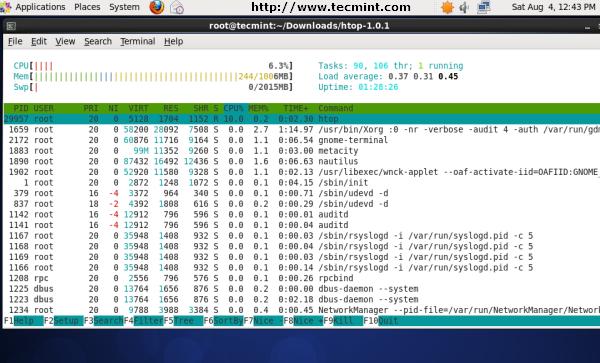
Htop is a much advanced interactive and real time Linux process monitoring tool. This is much similar to Linux top command but it has some rich features like user friendly interface to manage process, shortcut keys, vertical and horizontal view of the processes and much more. Htop is a third party tool and doesn’t included in Linux systems, you need to install it using YUM package manager tool. For more information on installation read our article below.

# htop
Htop Command Example

Htop Command Example Screenshot

For Htop installation read : Install Htop (Linux Process Monitoring) in Linux

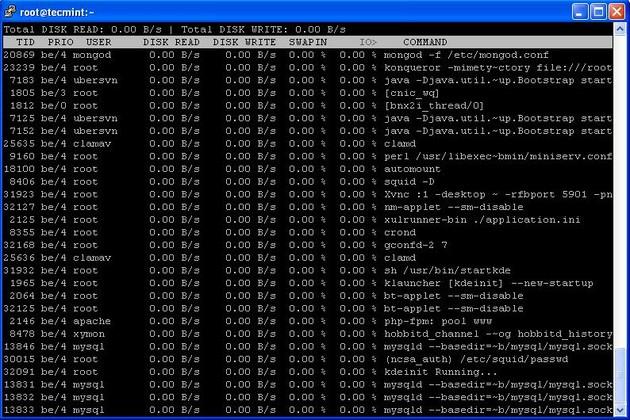
7. Iotop – Monitor Linux Disk I/O

Iotop is also much similar to top command and Htop program, but it has accounting function to monitor and display real time Disk I/O and processes. This tool is much useful for finding the exact process and high used disk read/writes of the processes.

# iotop
Iotop Command Example

Iotop Command Example Screenshot

For Ioptop installation and usage read : Install Iotop in Linux

8. Iostat – Input/Output Statistics

IoStat is simple tool that will collect and show system input and output storage device statistics. This tool is often used to trace storage device performance issues including devices, local disks,remote disks such as NFS.

# iostat

Linux 2.6.18-238.9.1.el5 (tecmint.com)         09/13/2012

avg-cpu:  %user   %nice %system %iowait  %steal   %idle
           2.60    3.65    1.04    4.29    0.00   88.42

Device:            tps   Blk_read/s   Blk_wrtn/s   Blk_read   Blk_wrtn
cciss/c0d0       17.79       545.80       256.52  855159769  401914750
cciss/c0d0p1      0.00         0.00         0.00       5459       3518
cciss/c0d0p2     16.45       533.97       245.18  836631746  384153384
cciss/c0d0p3      0.63         5.58         3.97    8737650    6215544
cciss/c0d0p4      0.00         0.00         0.00          8          0
cciss/c0d0p5      0.63         3.79         5.03    5936778    7882528
cciss/c0d0p6      0.08         2.46         2.34    3847771    3659776

For more Iostat usage and examples visit : 6 Iostat Command Examples in Linux

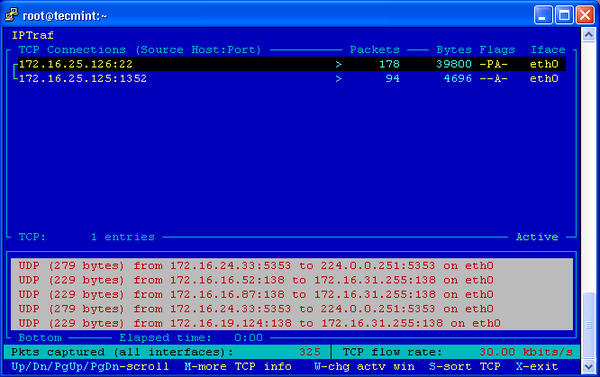
9. IPTraf – Real Time IP LAN Monitoring

IPTraf is an open source console-based real time network (IP LAN) monitoring utility for Linux. It collects a variety of information such as IP traffic monitor that passes over the network, including TCP flag information, ICMP details, TCP/UDP traffic breakdowns, TCP connection packet and byne counts. It also gathers information of general and detaled interface statistics of TCP, UDP, IP, ICMP, non-IP, IP checksum errors, interface activity etc.

IP Traffic Monitor

For more information and usage of IPTraf tool, please visit : IPTraf Network Monitoring Tool

10. Psacct or Acct – Monitor User Activity

psacct or acct tools are very useful for monitoring each users activity on the system. Both daemons runs in the background and keeps a close watch on the overall activity of each user on the system and also what resources are being consumed by them.

These tools are very useful for system administrators to track each users activity like what they are doing, what commands they issued, how much resources are used by them, how long they are active on the system etc.

For installation and example usage of commands read the article on Monitor User Activity with psacct or acct

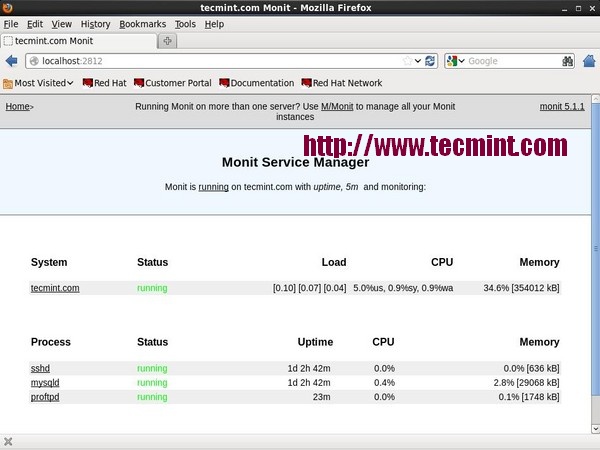
11. Monit – Linux Process and Services Monitoring

Monit is a free open source and web based process supervision utility that automatically monitors and managers system processes, programs, files, directories, permissions, checksums and filesystems.

It monitors services like Apache, MySQL, Mail, FTP, ProFTP, Nginx, SSH and so on. The system status can be viewed from the command line or using it own web interface.

Monit Linux Process Monitoring

Read More : Linux Process Monitoring with Monit

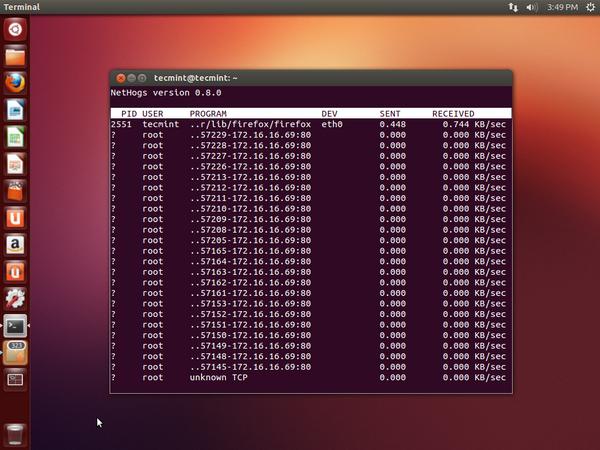
12. NetHogs – Monitor Per Process Network Bandwidth

NetHogs is an open source nice small program (similar to Linux top command) that keeps a tab on each process network activity on your system. It also keeps a track of real time network traffic bandwidth used by each program or application.

NetHogs Linux Bandwidth Monitoring

Read More : Monitor Linux Network Bandwidth Using NetHogs

13. iftop – Network Bandwidth Monitoring

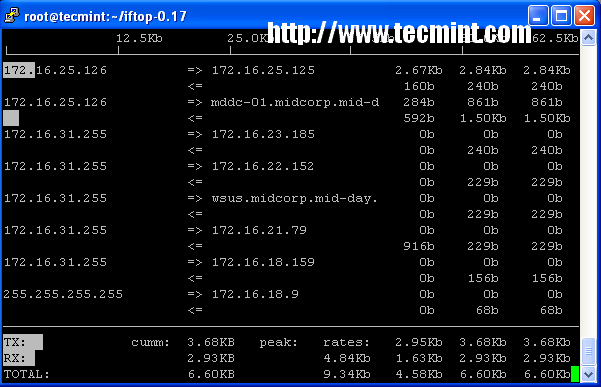
iftop is another terminal-based free open source system monitoring utility that displays a frequently updated list of network bandwidth utilization (source and destination hosts) that passing through the network interface on your system. iftop is considered for network usage, what ‘top‘ does for CPU usage. iftop is a ‘top‘ family tool that monitor a selected interface and displays a current bandwidth usage between two hosts.

iftop - Network Bandwidth Monitoring

Read More : iftop – Monitor Network Bandwidth Utilization

14. Monitorix – System and Network Monitoring

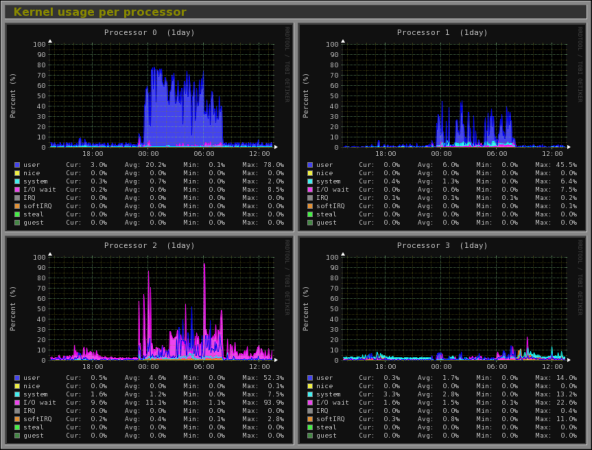
Monitorix is a free lightweight utility that is designed to run and monitor system and network resources as many as possible in Linux/Unix servers. It has a built in HTTP web server that regularly collects system and network information and display them in graphs. It Monitorssystem load average and usage, memory allocation, disk driver health, system services, network ports, mail statistics (Sendmail, Postfix, Dovecot, etc), MySQL statistics and many more. It designed to monitor overall system performance and helps in detecting failures, bottlenecks, abnormal activities etc.

Monitorix Monitoring

Read More : Monitorix a System and Network Monitoring Tool for Linux

15. Arpwatch – Ethernet Activity Monitor

Arpwatch is a kind of program that is designed to monitor Address Resolution (MAC and IPaddress changes) of Ethernet network traffic on a Linux network. It continuously keeps watch on Ethernet traffic and produces a log of IP and MAC address pair changes along with a timestamps on a network. It also has a feature to send an email alerts to administrator, when a pairing added or changes. It is very useful in detecting ARP spoofing on a network.

Read More : Arpwatch to Monitor Ethernet Activity

16. Suricata – Network Security Monitoring

Suricata is an high performance open source Network Security and Intrusion Detection andPrevention Monitoring System for Linux, FreeBSD and Windows.It was designed and owned by a non-profit foundation OISF (Open Information Security Foundation).

Read More : Suricata – A Network Intrusion Detection and Prevention System

17. VnStat PHP – Monitoring Network Bandwidth

VnStat PHP a web based frontend application for most popular networking tool called “vnstat“.VnStat PHP monitors a network traffic usage in nicely graphical mode. It displays a total IN andOUT network traffic usage in hourly, daily, monthly and full summary report.

Read More : VnStat PHP – Monitoring Network Bandwidth

18. Nagios – Network/Server Monitoring

Nagios is an leading open source powerful monitoring system that enables network/system administrators to identify and resolve server related problems before they affect major business processes. With the Nagios system, administrators can able to monitor remote Linux, Windows, Switches, Routers and Printers on a single window. It shows critical warnings and indicates if something went wrong in your network/server which indirectly helps you to begin remediation processes before they occur.

Read More : Install Nagios Monitoring System to Monitor Remote Linux/Windows Hosts

19. Nmon: Monitor Linux Performance

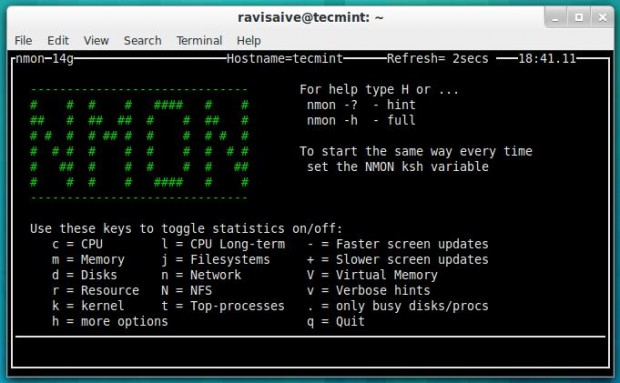
Nmon (stands for Nigel’s performance Monitor) tool, which is used to monitor all Linux resources such as CPU, Memory, Disk Usage, Network, Top processes, NFS, Kernel and much more. This tool comes in two modes: Online Mode and Capture Mode.

The Online Mode, is used for real-time monitoring and Capture Mode, is used to store the output in CSV format for later processing.

Nmon Monitoring

Read More: Install Nmon (Performance Monitoring) Tool in Linux

20. Collectl: All-in-One Performance Monitoring Tool

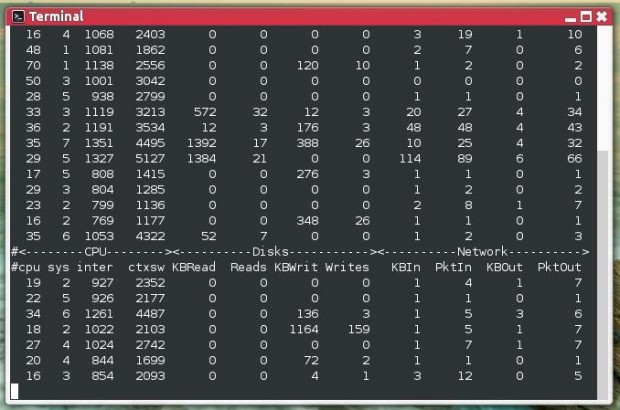
Collectl is a yet another powerful and feature rich command line based utility, that can be used to gather information about Linux system resources such as CPU usage, memory, network, inodes, processes, nfs, tcp, sockets and much more.

Collectl Monitoring

Read More: Install Collectl (All-in-One Performance Monitoring) Tool in Linux

We would like to know what kind of monitoring programs you use to monitor performance of your Linux servers? If we’ve missed any important tool that you would like us to include in this list, please inform us via comments and please don’t forget to share it.


Pfsense on VirtualBox

UBUNTU TOUCH EMULATOR: INSTALLATION AND USAGE IN UBUNTU 14.04

$
0
0

A while back, Canonical released an experimental Ubuntu Touch emulator running Unity 8 and Mir. Back then, there were a few bugs, including a nasty one on 64bit that could break the system and since they were fixed, I though I’d write an article on how to properly install and use the Ubuntu Touch Emulator in Ubuntu 14.04, 13.10 and 12.04.

Ubuntu Touch Emulator

The initial Ubuntu Touch Emulator installation instructions changed so if you’ve installed the first experimental release, use the instructions below to create new instances.
Below you can watch two quick Ubuntu Touch Emulator test videos I’ve recoded in Ubuntu 14.04:


(ARM instance; direct video link)


(x86 instance; direct video link)

Ubuntu Touch Emulator is available in the official Ubuntu 14.04 repositories but it’s an old version and futhermore, it doesn’t support x86 instances, so I recommend using the Phablet Tools PPA, which has packages for Ubuntu 14.04, 13.10 and 12.04.
Add the Phablet Tools PPA and install the emulator using the following commands:
sudo add-apt-repository ppa:phablet-team/tools
sudo apt-get update
sudo apt-get install ubuntu-emulator

If you’ve installed an older version of Ubuntu Emulator, also run an upgrade:

sudo apt-get upgrade
The Ubuntu Emulator package is also available in the Ubuntu SDK PPA, but it’s an older version at the time I’m writing this article (about one month older than the one from the Phablet Tools PPA).
Note that I’ve only tested it in Ubuntu 14.04 and 12.04, but it should also work in Ubuntu 13.10 since the PPA above has packages for it.

Creating and running instances

1. The first thing you need to do is create a new instance – we’ll call it “UbuntuTouch” in the commands below:

Create an ARM instance:

sudo ubuntu-emulator create UbuntuTouch --channel=ubuntu-touch/utopic-proposed

To create an Ubuntu Touch Emulator x86 instance, use the following command:

sudo ubuntu-emulator create UbuntuTouch –arch=i386 –channel=ubuntu-touch/utopic-proposed

The current “stable” image doesn’t seem to work, that’s why I’ve added the Utopic proposed channel for the image in the commands above.

On Ubuntu 12.04, you may get the following error:

Error while converting ~/.local/share/ubuntu-emulator/UbuntuTouch/system.img: Unknown option 'compat'
qemu-img: Invalid options for file format 'qcow2'.
I’m not sure why this error is displayed, but the emulator runs just fine so ignore it.

2. Then, run the new instance by using the following command:

ubuntu-emulator run UbuntuTouch

The first time you run the emulator, the boot process will take quite a while. When it finishes booting, a shell with Ubuntu Touch will start, asking you to enter the username and password:

Ubuntu Touch Emulator shell
If you want to interact with the emulator via an interactive ADB session, log in here using “phablet” (without the quotes) for both the username and password. It’s not required to log in here if you only want to use the Ubuntu Touch Emulator GUI.
After this, it might take another few minutes and Unity 8 with Mir should be loaded in the Ubuntu Touch Emulator.
In theory, Ubuntu Touch emulator should support some parameters, such as setting the memory (“–memory”), which by default is set to 512mb of RAM, but for some reason the instance doesn’t start when using this, or at least it didn’t in my test.

3. Optional: change the Ubuntu Touch Emulator size: 

Ubuntu Touch Emulator with a 0.7 scale on my 1920×1080 monitor.
If the default Ubuntu Touch Emulator size is too big for your screen, you can scale it down. To do this, run it with the “–scale” option. For instance, to scale the emulator to half its original size, use:
ubuntu-emulator run --scale 0.5 UbuntuTouch
Notes:
  • the downloaded images are stored under ~/.cache/ubuntuimages
  • the images are stored under ~/.local/share/ubuntu-emulator

Deleting instances

To delete an Ubuntu Touch Emulator instance, use the following command:

sudo ubuntu-emulator destroy UbuntuTouch
Where “UbuntuTouch” is the name of the instance you’ve created. If you can’t remember the name, you can run the command below to list your Ubuntu Touch Emulator instances:
ubuntu-emulator list

Creating / restoring snapshots

Ubuntu Touch Emulator supports disk snapshots – to take a snapshot, use the following command:
ubuntu-emulator snapshot --create=SNAPSHOT1 UbuntuTouch
where “SNAPSHOT1″ is the name of the snapshot and “UbuntuTouch” is the name of your instance created above.

Then, when you wish to restore this snapshot, use:

ubuntu-emulator snapshot --revert=SNAPSHOT1 UbuntuTouch

You can also use “–revert-pristine” to revert to the originally created snapshot.


Install Android 4.4 Kitkat on your PC using Virtual Box

$
0
0

Installing Chromium OS in VirtualBox

Plop : Boot from USB from any Computer/VirtualBox (Live CD/small Linux Distro)


Backing up Ubuntu (Image backup of your OS) Clonezilla and Scheduled backups using Timeshift

Kodi (xbmc) Super Repo – How to Install SuperRepo Repository

$
0
0

::Add-ons for XBMC::

(Please follow the rules and regulations of your country in relation to watching streaming videos (also tv licensing))
project free tv (for any movies and tv shows)
1 channel (for any movies and tv shows) (primewire)

Genesis (movies and tv shows)
mashup (for any movies and tv shows)
filmon or F.T.V (for uk live tv)
docuhub (for documentaries)
XBMC hub wizard
SuperRepo (repository for add-ons)
Shani Repo (repository for add-ons)
Netflix (for connecting to your netflix account)
Pak India live (live indo-pak channels)
PVR Simple client (but disable the PVR demo client) (100s of TV channels (sports channels/Discovery/National Geographic/Movies)) (http://bbts.thewiz.info/PVR/bbtspvr.m3u ) (http://xbmcbbts.weebly.com/)
Yify (movies)


How to Clone Your Raspberry Pi SD Cards With Windows

$
0
0

The Raspberry Pi runs from an operating system stored on a Secure Digital (SD) card and many different operating systems may be employed. Storage is relatively inexpensive, can be created (flashed), recreated, written to and overwritten with ease.

On the one hand, this is an advantage of the Pi. On the other, the experimental nature of the Pi means more time flashing SD cards. This tutorial shows you how to clone any Raspberry Pi SD card which is particularly useful when you have your OS set up just as you want it.

The Raspberry Pi is somewhat different to the computing, to which most of us have been accustomed, of the last two decades. It’s a bare-bones board of components and connectors that requires you to source a power supply, keyboard, monitor and mouse to get it up and running.

With almost two and a half million units sold–in little over a year since its launch–and with its focus on getting kids (adults?) coding and experimenting, it might not be an exaggeration to consider the Raspberry Pi to be a revolutionary device.

Being able to experiment, play and break things is all part of the fun. By cloning your SD cards, you can be up and running again with the minimum of downtime.

Before embarking on cloning your SD card, install NOOBS or the OS of your choice, customise it and get it set up exactly how you like to use it.

Tip: To set up your SD card, read our tutorials How to Flash an SD Card for Raspberry Piand How to Install NOOBS on a Raspberry Pi With a Mac.

These tutorials will get you up and running with an operating system, on an SD card, for use with your Raspberry Pi.

Cloning is the process of making an exact copy. The steps shown, below, will take you through the process of creating a disk image of your existing Raspberry Pi SD card, regardless of the exact operating system you have on it or how it has been set up.

The benefit of having a disk image of your SD card is that you have a backup of your data from which you can easily write a new SD card

Win32DiskImager at Sourceforge

Download Win32DiskImager from the Win32DiskImager SourceForge page.

Once your RPi SD Card is all set up as you want it, remove it from RPi and insert into your Windows computer

Setting up the SD card to clone

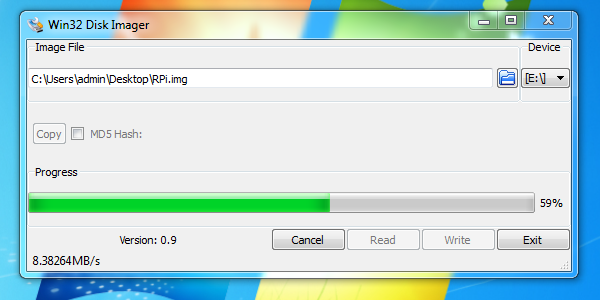
Launch Win32DiskImager. In the box marked Image File enter the path to, and a name, for the image file that you are about to create. In this example I have gone with C:\Users\admin\Desktop\RPi.img

Select the drive letter for your SD card in the Device box, in my example this is E:

Progress of reading the original SD card

Click the buttom marked Read

Wait for the imaging of the SD card to be completed. There is a progress bar that will give you an idea as to how long this will take.

Insert a blank (or used and nuked) SD card into the SD card reader on your Windows computer.

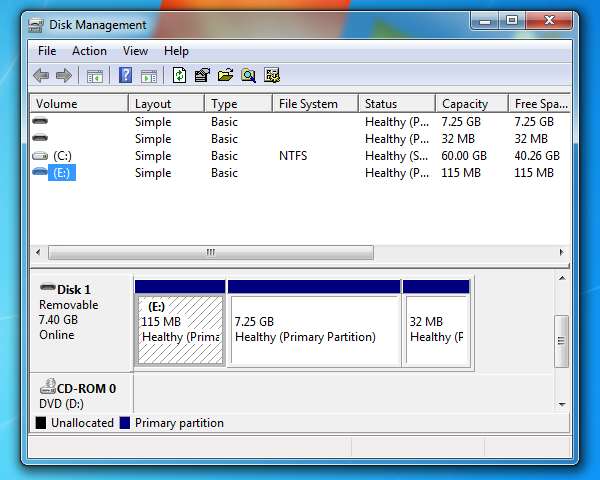
The Disk Management program

Click on the Start menu icon and type disk management and press theReturn key to locate and open the Disk Management program.

Delete the partitions and format the SD Card

Secondary-click on the volume to bring up the context-sensitive menu and delete all of the partitions on the SD card (if there are any).

Format the SD Card as FAT–32 or NTFS, as these filesystems are recognised by Windows computers, by secondary-clicking to bring up the context-sensitive menu and select Format….

Preparing to write an SD card from a disk image

Launch Win32DiskImager. Click on the blue folder icon and browse to the location where you previously saved your Raspberry Pi SD card image file, ending .img, in my example RPi.img

Under Device, select the drive letter of your SD card, in my example E:

Click the Write button.

Double-check your destination drive is correct before writing data

You will see a warning dialogue box saying Writing to a physical device can corrupt the device. (Target device [E:] “RPI”) Are you sure you want to continue?

Double-check you have selected the correct destination for your SD card and click the Yes button.

Again, the progress bar will be shown to give you an indication of how long the process will take to complete.

When completed, eject the SD card from the SD card reader. This SD card should be an exact clone of your previously backed-up SD card.

This process makes it easier to get a Raspberry Pi up and running again.

Raspbian running from a cloned SD card

At any time you need to revert to a cloned SD card, don’t be hasty. Instead of swapping out the existing card with the clone, ensure that you re-clone the clone before using it.

This way, you will always have a version of your OS ready to go, just as you like it and without the need for a lengthy workflow in flashing, installing, upgrading and updating software.

In this tutorial I have shown you how to clone your Raspberry Pi SD card using Microsoft Windows and a program called Win32DiskImager.

Cloning your SD cards can save a lot of time meaning that you can spend more time enjoying and experimenting with your Raspberry Pi.


How to do System Recovery on Lenovo z580

$
0
0

You will need to follow the steps below.

1. Backup all your data in C: drive.

2. Shut down the computer.

3. Remove any external media except the charger.

4. After removing, Press the small button with a ‘up to down’ near the power button.

5. The normal BIOS screen would occur and then the “windows is loading files” would show. Wait till it boots.

6. After booting, click the 2nd option which says “Onekey Recovery”

7. Then tick initial backup and click next. Two prompts would occur. Answer accordingly.

8. Now recovery would start

By now your machine should be back to the factory defaults.


How to convert .img files to .vdi for Virtualbox

$
0
0
To convert an .img file to .vdi in Linux, so that you can directly use it in VirtualBox, open a terminal and paste this:
VBoxManage convertdd  file.img file.vdi

For instance, to convert the recently mentioned ChromeOS Cherry from .img to .vdi:
VBoxManage convertdd ChromeOS-Cherry.img ChromeOS-Cherry.vdi

To do this is Windows (I haven’t tested it but it should work), open cmd.exe (Start > Run, enter: cmd.exe), navigate to “C:\Program Files\innotek VirtualBox” (using the “cd” command), then run this (after placing the .img file inside the “C:\Program Files\innotek VirtualBox” folder):

VBoxManage.exe convertdd file.img file.vdi

Please let us know if you have tried this in Windows and rather or not it worked.

To use it in VirtualBox, create a new Virtual Machine, select “Use existing hard disk” and browse for the recetly converted .vdi file:

virtualbox use existing hard disk

Viewing all 174 articles
Browse latest View live